> ## Documentation Index
> Fetch the complete documentation index at: https://wb-21fd5541-feat-cli-docs-generator.mintlify.site/llms.txt
> Use this file to discover all available pages before exploring further.
# Configure SSO with OIDC
W\&B Server's support for OpenID Connect (OIDC) compatible identity providers allows for management of user identities and group memberships through external identity providers like Okta, Keycloak, Auth0, Google, and Entra.
## OpenID Connect (OIDC)
W\&B Server supports the following OIDC authentication flows for integrating with external Identity Providers (IdPs).
1. Implicit Flow with Form Post
2. Authorization Code Flow with Proof Key for Code Exchange (PKCE)
These flows authenticate users and provide W\&B Server with the necessary identity information (in the form of ID tokens) to manage access control.
The ID token is a JWT that contains the user's identity information, such as their name, username, email, and group memberships. W\&B Server uses this token to authenticate the user and map them to appropriate roles or groups in the system.
In the context of W\&B Server, access tokens authorize requests to APIs on behalf of the user, but since W\&B Server’s primary concern is user authentication and identity, it only requires the ID token.
You can use environment variables to [configure IAM options](/platform/hosting/iam/advanced_env_vars/) for your [Dedicated Cloud](/platform/hosting/hosting-options/dedicated_cloud) or [Self-Managed](/platform/hosting/hosting-options/self-managed) instance.
To assist with configuring Identity Providers for [Dedicated Cloud](/platform/hosting/hosting-options/dedicated_cloud) or [Self-Managed](/platform/hosting/hosting-options/self-managed) W\&B Server installations, follow these guidelines to follow for various IdPs. If you’re using the SaaS version of W\&B, reach out to [support@wandb.com](mailto:support@wandb.com) for assistance in configuring an Auth0 tenant for your organization.
Follow the procedure below to set up AWS Cognito for authorization:
1. First, sign in to your AWS account and navigate to the [AWS Cognito](https://aws.amazon.com/cognito/) App.
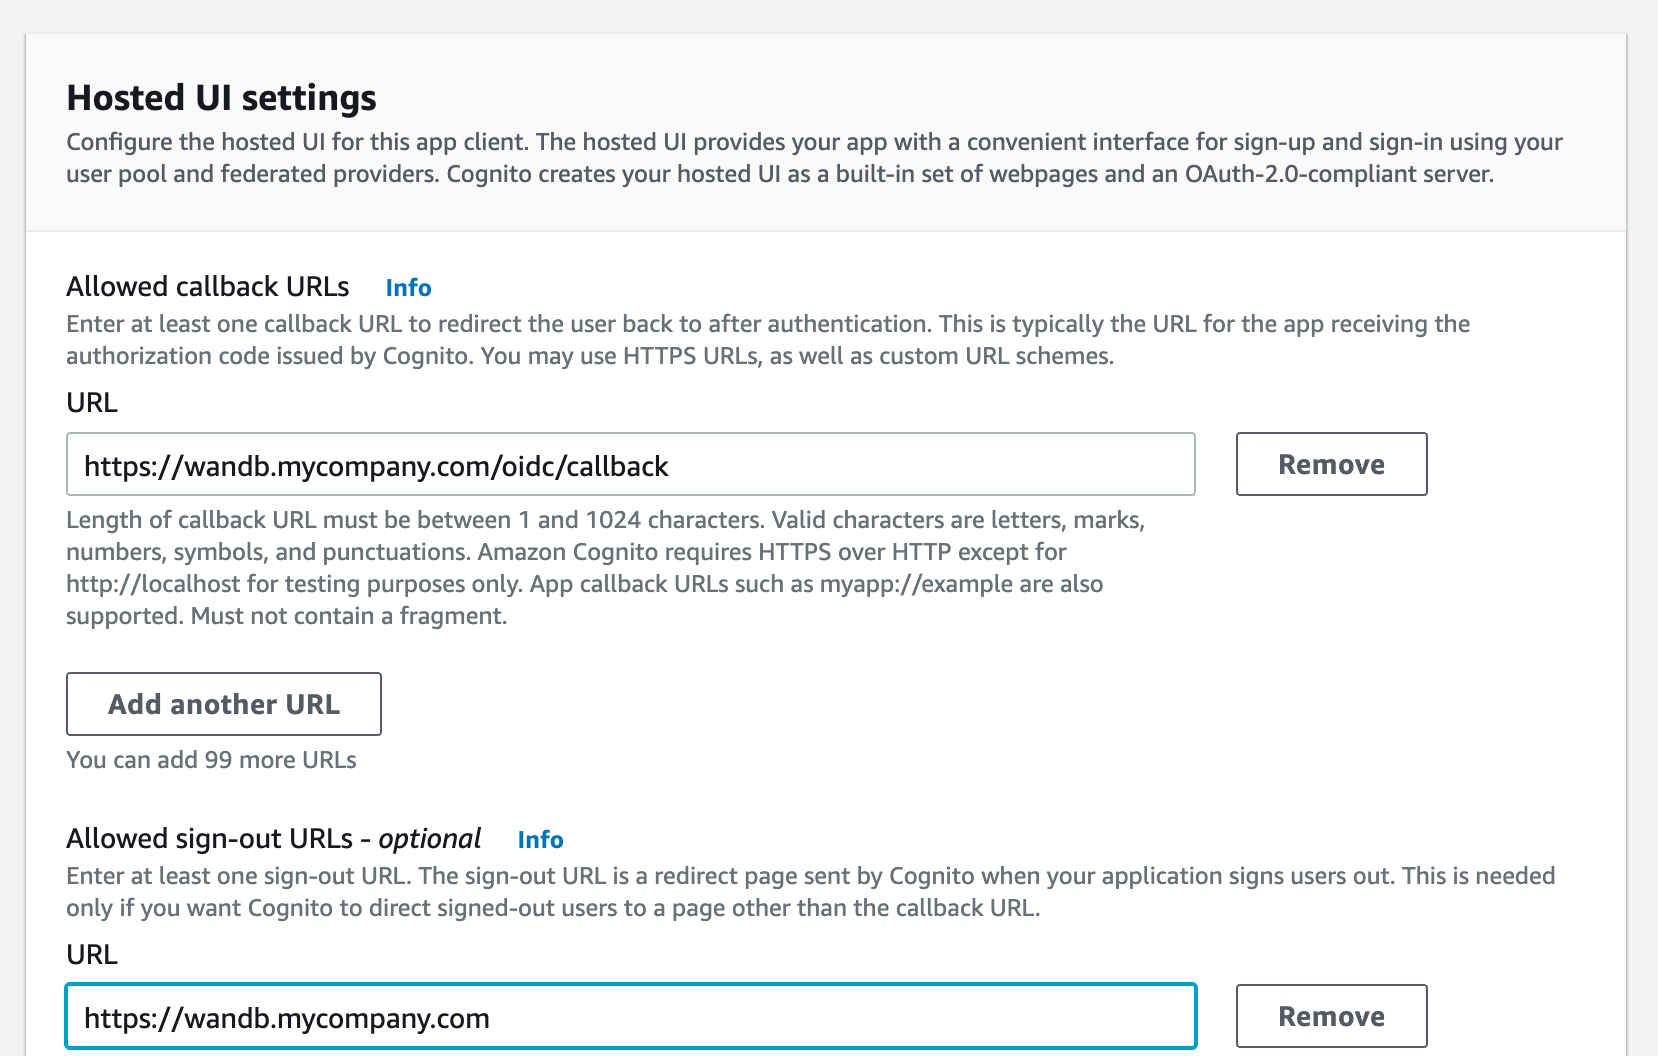
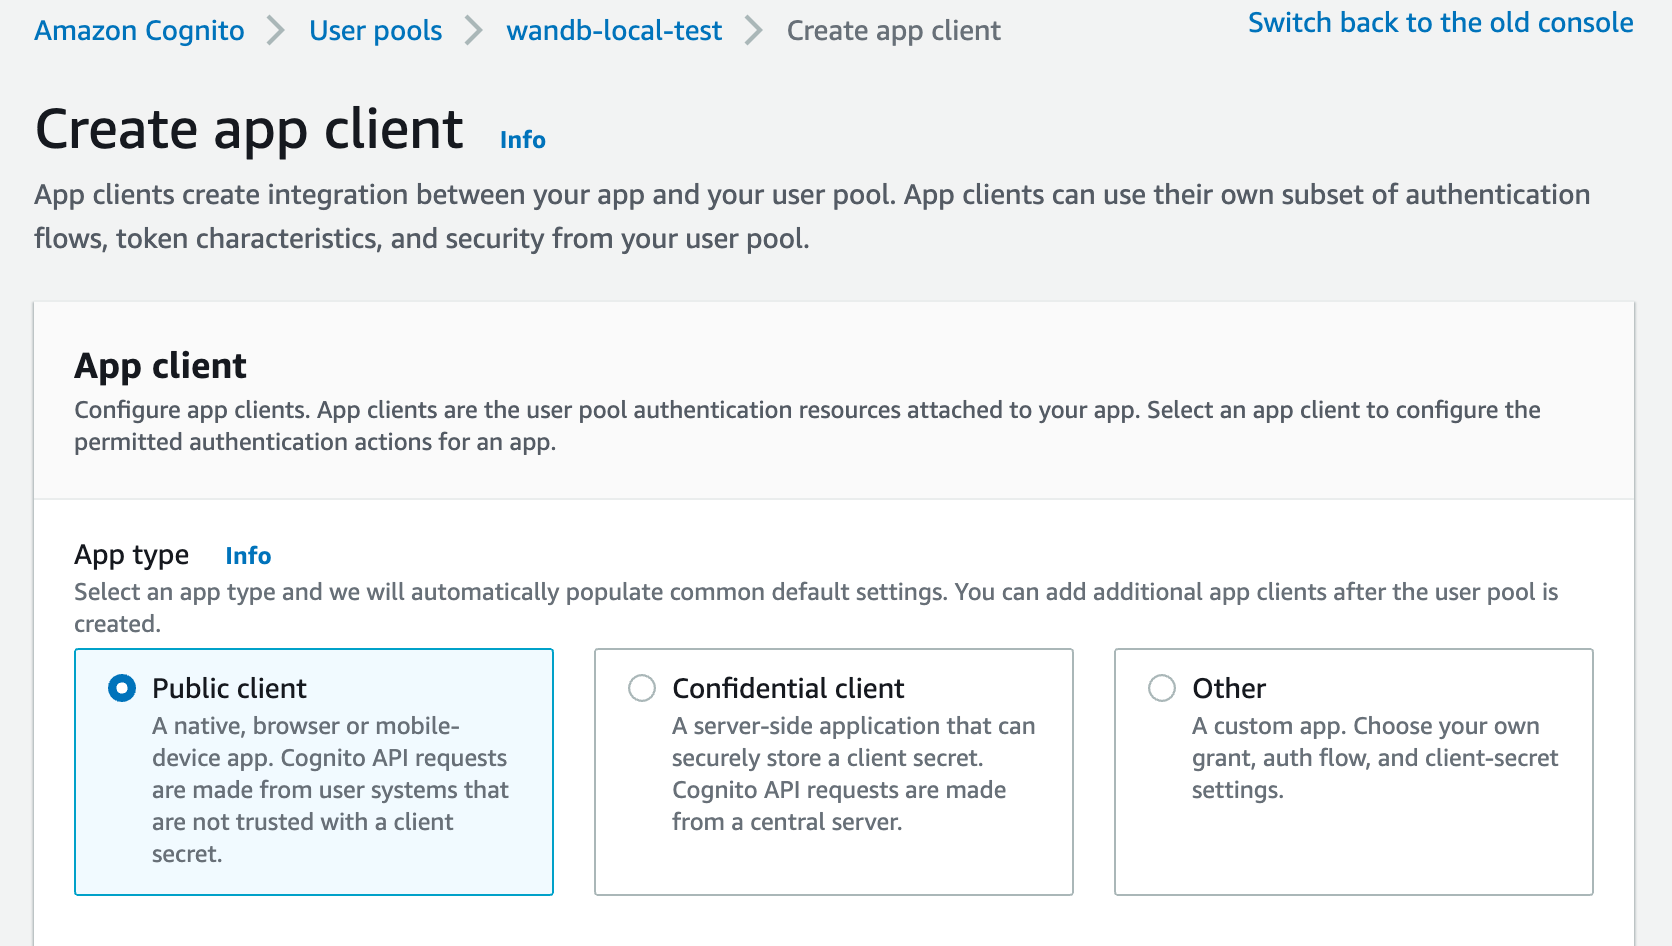 2. Provide an allowed callback URL to configure the application in your IdP:
* Add `http(s)://YOUR-W&B-HOST/oidc/callback` as the callback URL. Replace `YOUR-W&B-HOST` with your W\&B host path.
3. If your IdP supports universal logout, set the Logout URL to `http(s)://YOUR-W&B-HOST`. Replace `YOUR-W&B-HOST` with your W\&B host path.
For example, if your application was running at `https://wandb.mycompany.com`, you would replace `YOUR-W&B-HOST` with `wandb.mycompany.com`.
The image below demonstrates how to provide allowed callback and sign-out URLs in AWS Cognito.
2. Provide an allowed callback URL to configure the application in your IdP:
* Add `http(s)://YOUR-W&B-HOST/oidc/callback` as the callback URL. Replace `YOUR-W&B-HOST` with your W\&B host path.
3. If your IdP supports universal logout, set the Logout URL to `http(s)://YOUR-W&B-HOST`. Replace `YOUR-W&B-HOST` with your W\&B host path.
For example, if your application was running at `https://wandb.mycompany.com`, you would replace `YOUR-W&B-HOST` with `wandb.mycompany.com`.
The image below demonstrates how to provide allowed callback and sign-out URLs in AWS Cognito.
 *wandb/local* uses the [`implicit` grant with the `form_post` response type](https://auth0.com/docs/get-started/authentication-and-authorization-flow/implicit-flow-with-form-post) by default.
You can also configure *wandb/local* to perform an `authorization_code` grant that uses the [PKCE Code Exchange](https://www.oauth.com/oauth2-servers/pkce/) flow.
4. Select one or more OAuth grant types to configure how AWS Cognito delivers tokens to your app.
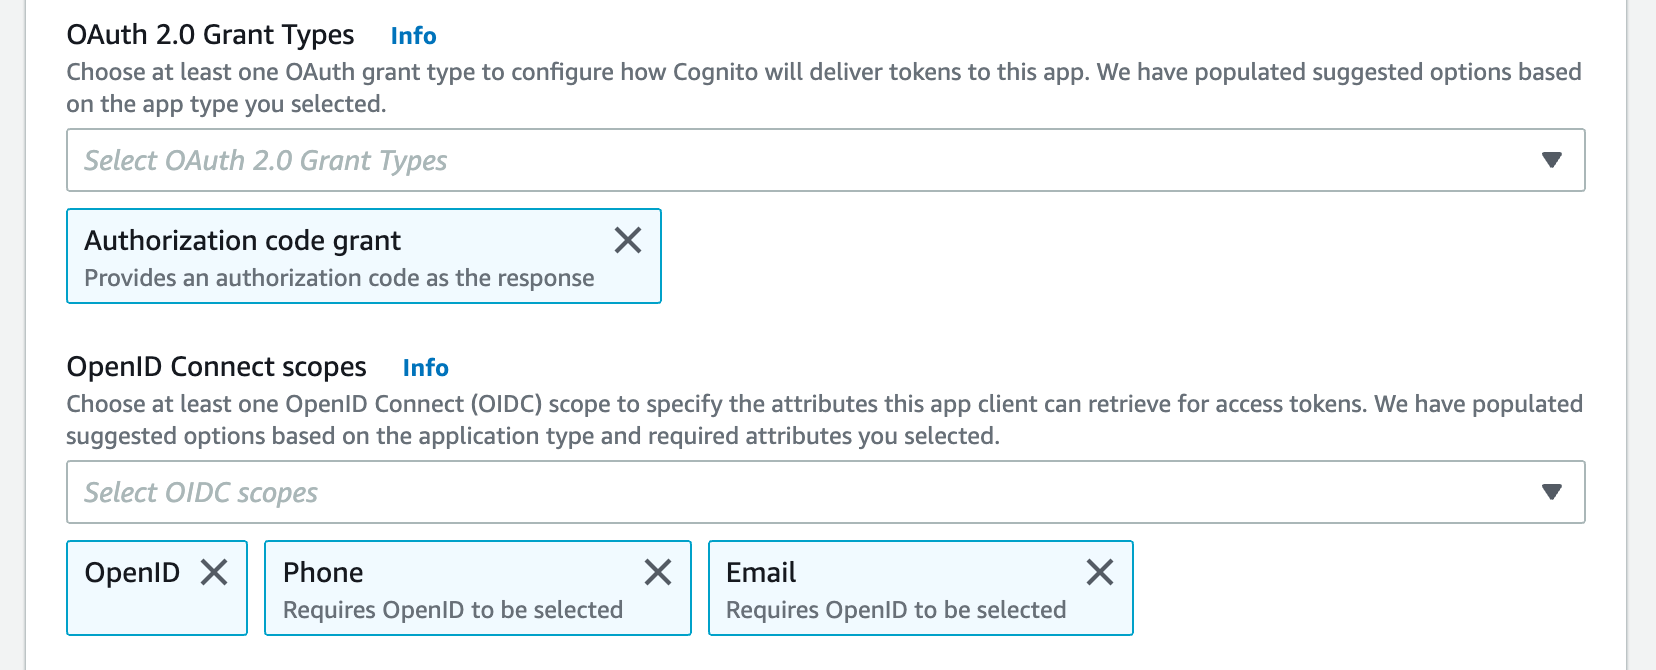
5. W\&B requires specific OpenID Connect (OIDC) scopes. Select the following from AWS Cognito App:
* "openid"
* "profile"
* "email"
For example, your AWS Cognito App UI should look similar to the following image:
*wandb/local* uses the [`implicit` grant with the `form_post` response type](https://auth0.com/docs/get-started/authentication-and-authorization-flow/implicit-flow-with-form-post) by default.
You can also configure *wandb/local* to perform an `authorization_code` grant that uses the [PKCE Code Exchange](https://www.oauth.com/oauth2-servers/pkce/) flow.
4. Select one or more OAuth grant types to configure how AWS Cognito delivers tokens to your app.
5. W\&B requires specific OpenID Connect (OIDC) scopes. Select the following from AWS Cognito App:
* "openid"
* "profile"
* "email"
For example, your AWS Cognito App UI should look similar to the following image:
 Select the **Auth Method** in the settings page or set the OIDC\_AUTH\_METHOD environment variable to tell *wandb/local* which grant to.
You must set the Auth Method to `pkce`.
6. You need a Client ID and the URL of your OIDC issuer. The OpenID discovery document must be available at `$OIDC_ISSUER/.well-known/openid-configuration`
For example, , you can generate your issuer URL by appending your User Pool ID to the Cognito IdP URL from the **App Integration** tab within the **User Pools** section:
Select the **Auth Method** in the settings page or set the OIDC\_AUTH\_METHOD environment variable to tell *wandb/local* which grant to.
You must set the Auth Method to `pkce`.
6. You need a Client ID and the URL of your OIDC issuer. The OpenID discovery document must be available at `$OIDC_ISSUER/.well-known/openid-configuration`
For example, , you can generate your issuer URL by appending your User Pool ID to the Cognito IdP URL from the **App Integration** tab within the **User Pools** section:
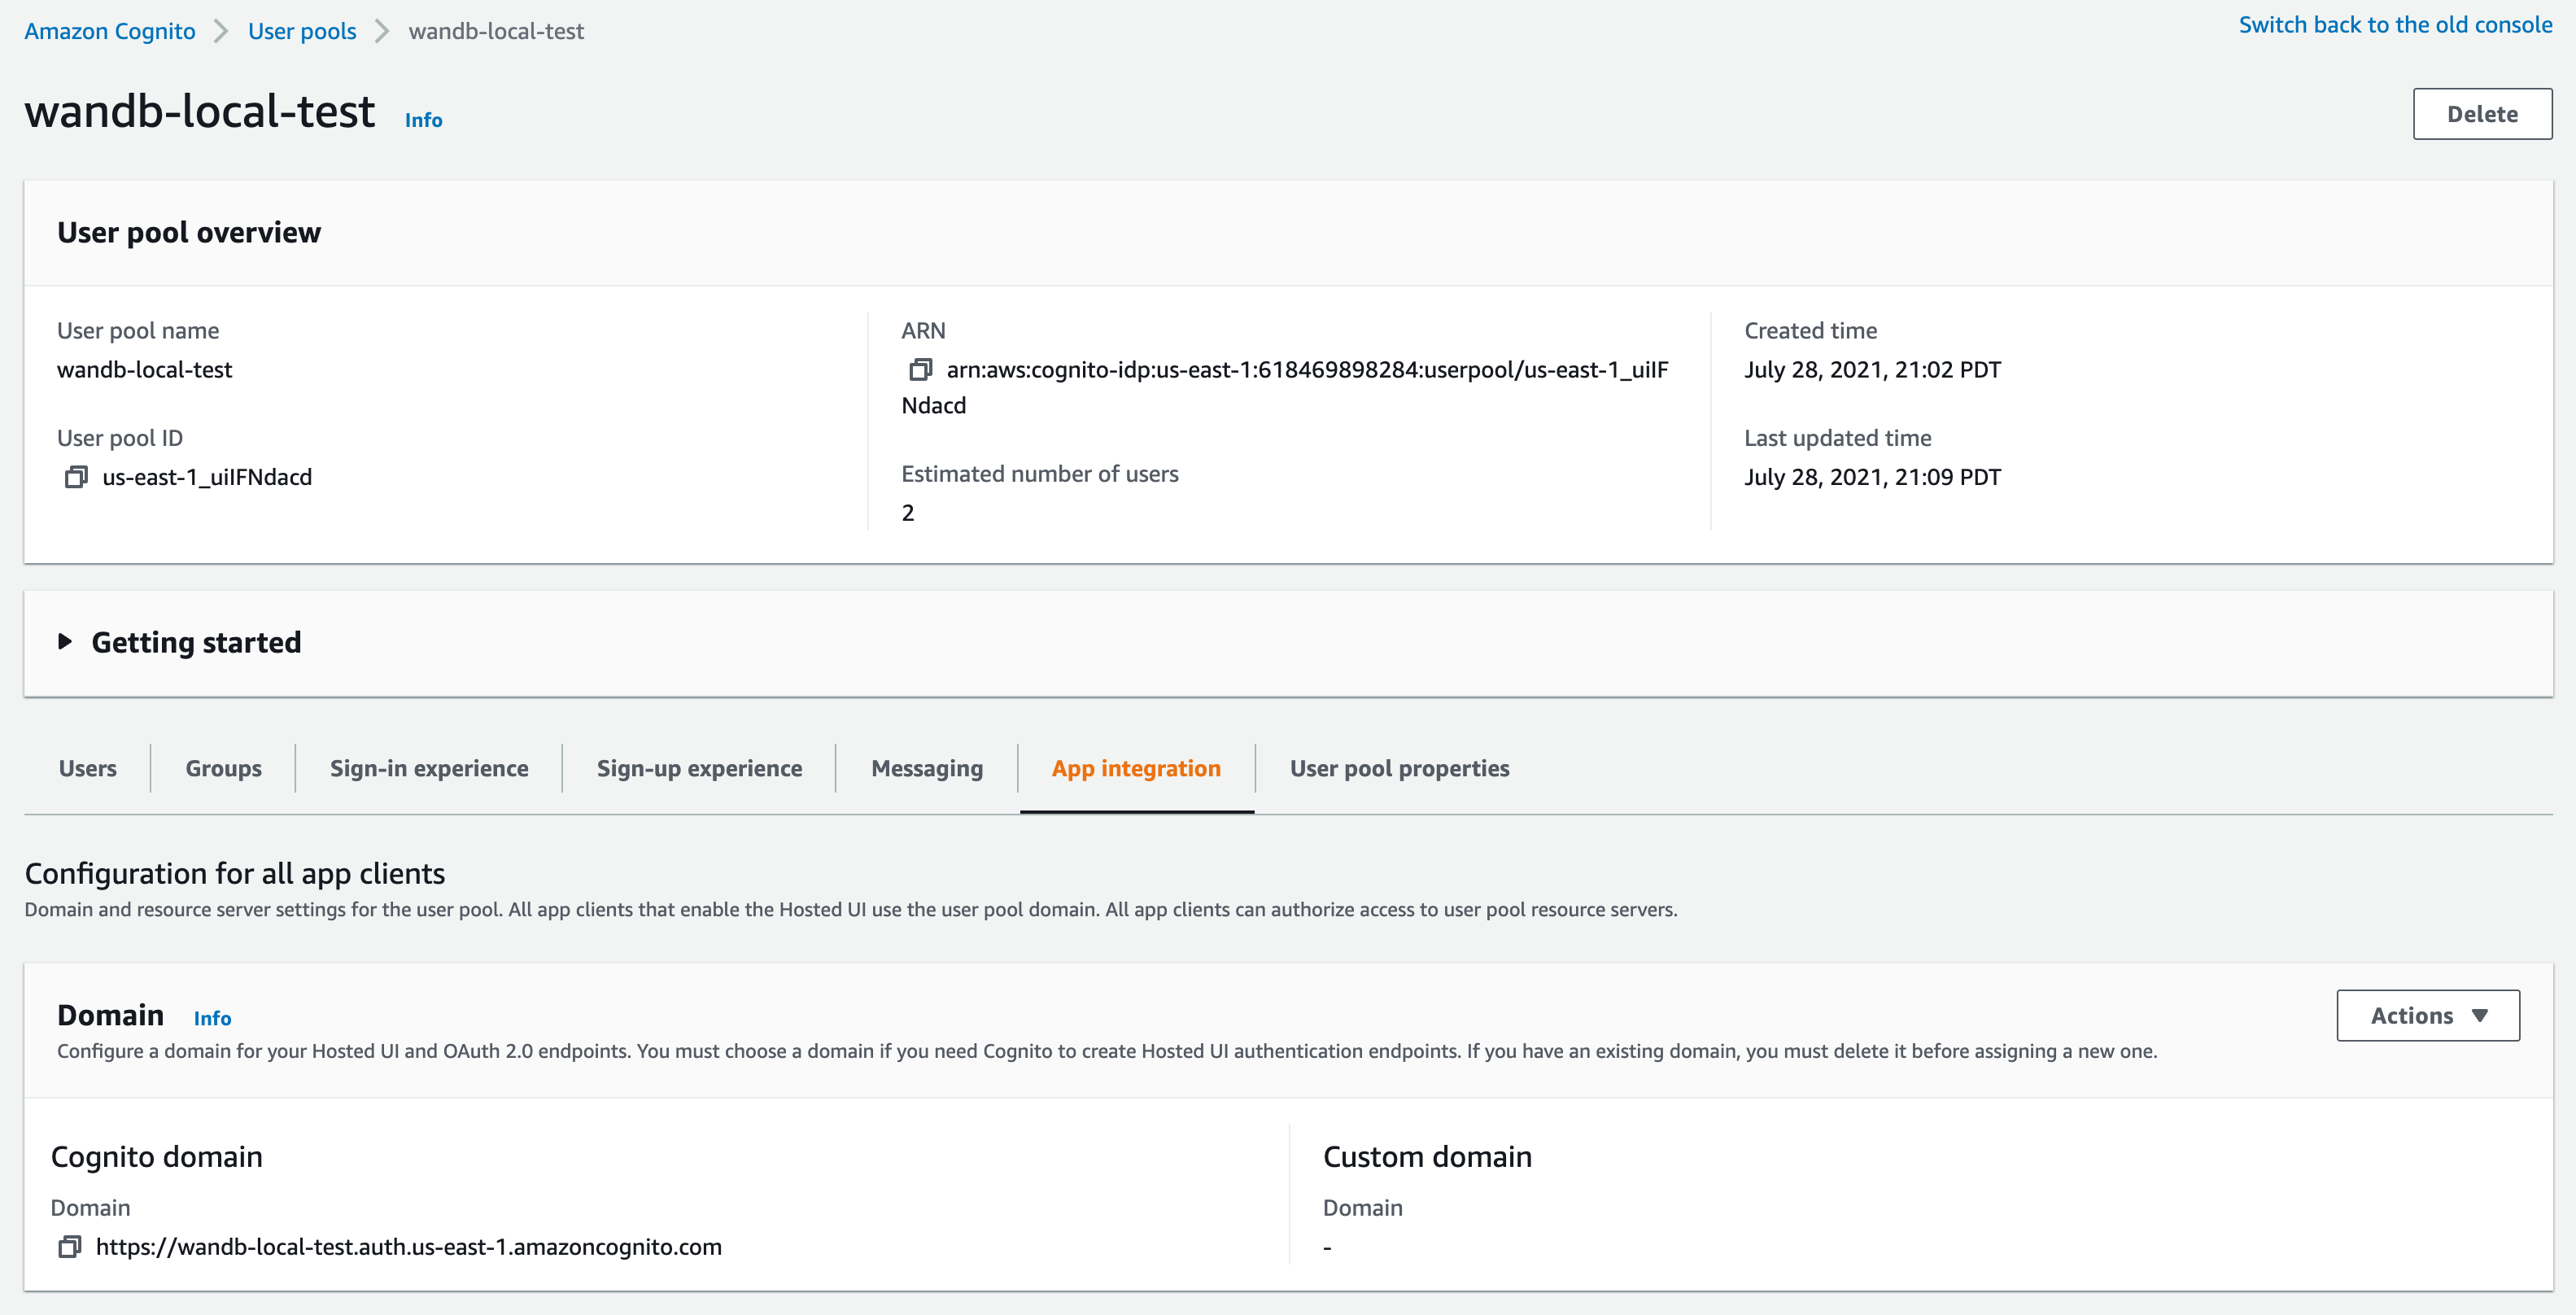 Do not use the "Cognito domain" for the IDP URL. Cognito provides it's discovery document at `https://cognito-idp.$REGION.amazonaws.com/$USER_POOL_ID`
Follow the procedure below to set up Okta for authorization:
1. Log in to the [Okta Portal](https://login.okta.com/).
2. On the left side, select **Applications** and then **Applications** again.
Do not use the "Cognito domain" for the IDP URL. Cognito provides it's discovery document at `https://cognito-idp.$REGION.amazonaws.com/$USER_POOL_ID`
Follow the procedure below to set up Okta for authorization:
1. Log in to the [Okta Portal](https://login.okta.com/).
2. On the left side, select **Applications** and then **Applications** again.
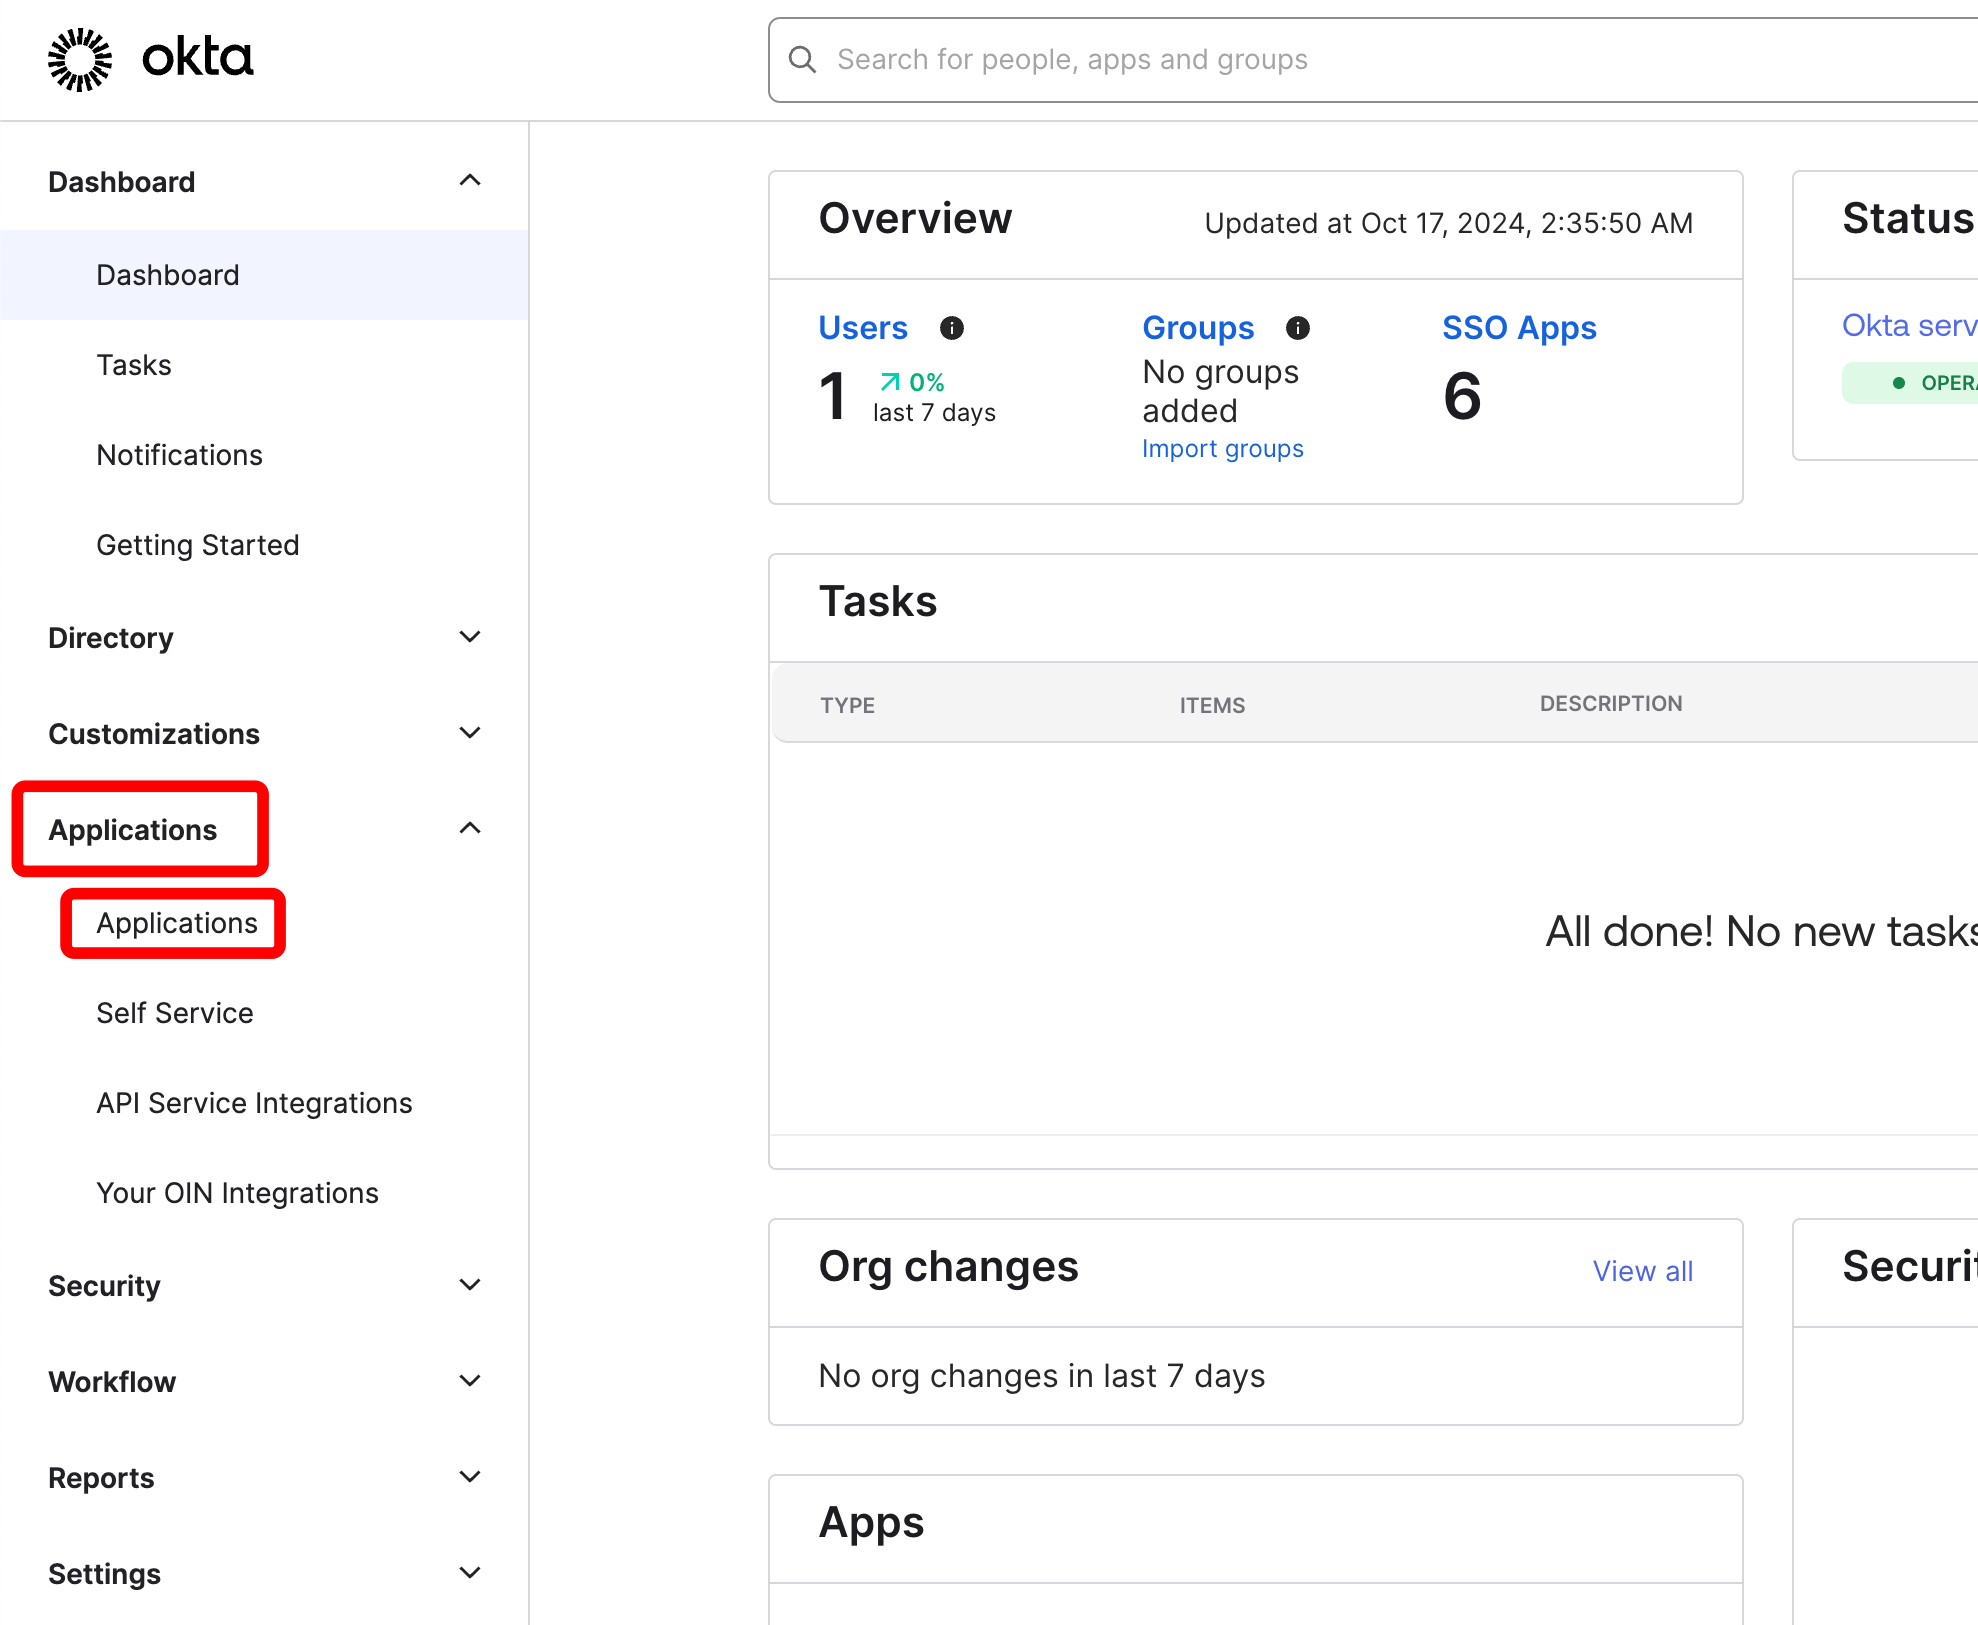 3. Click on "Create App integration."
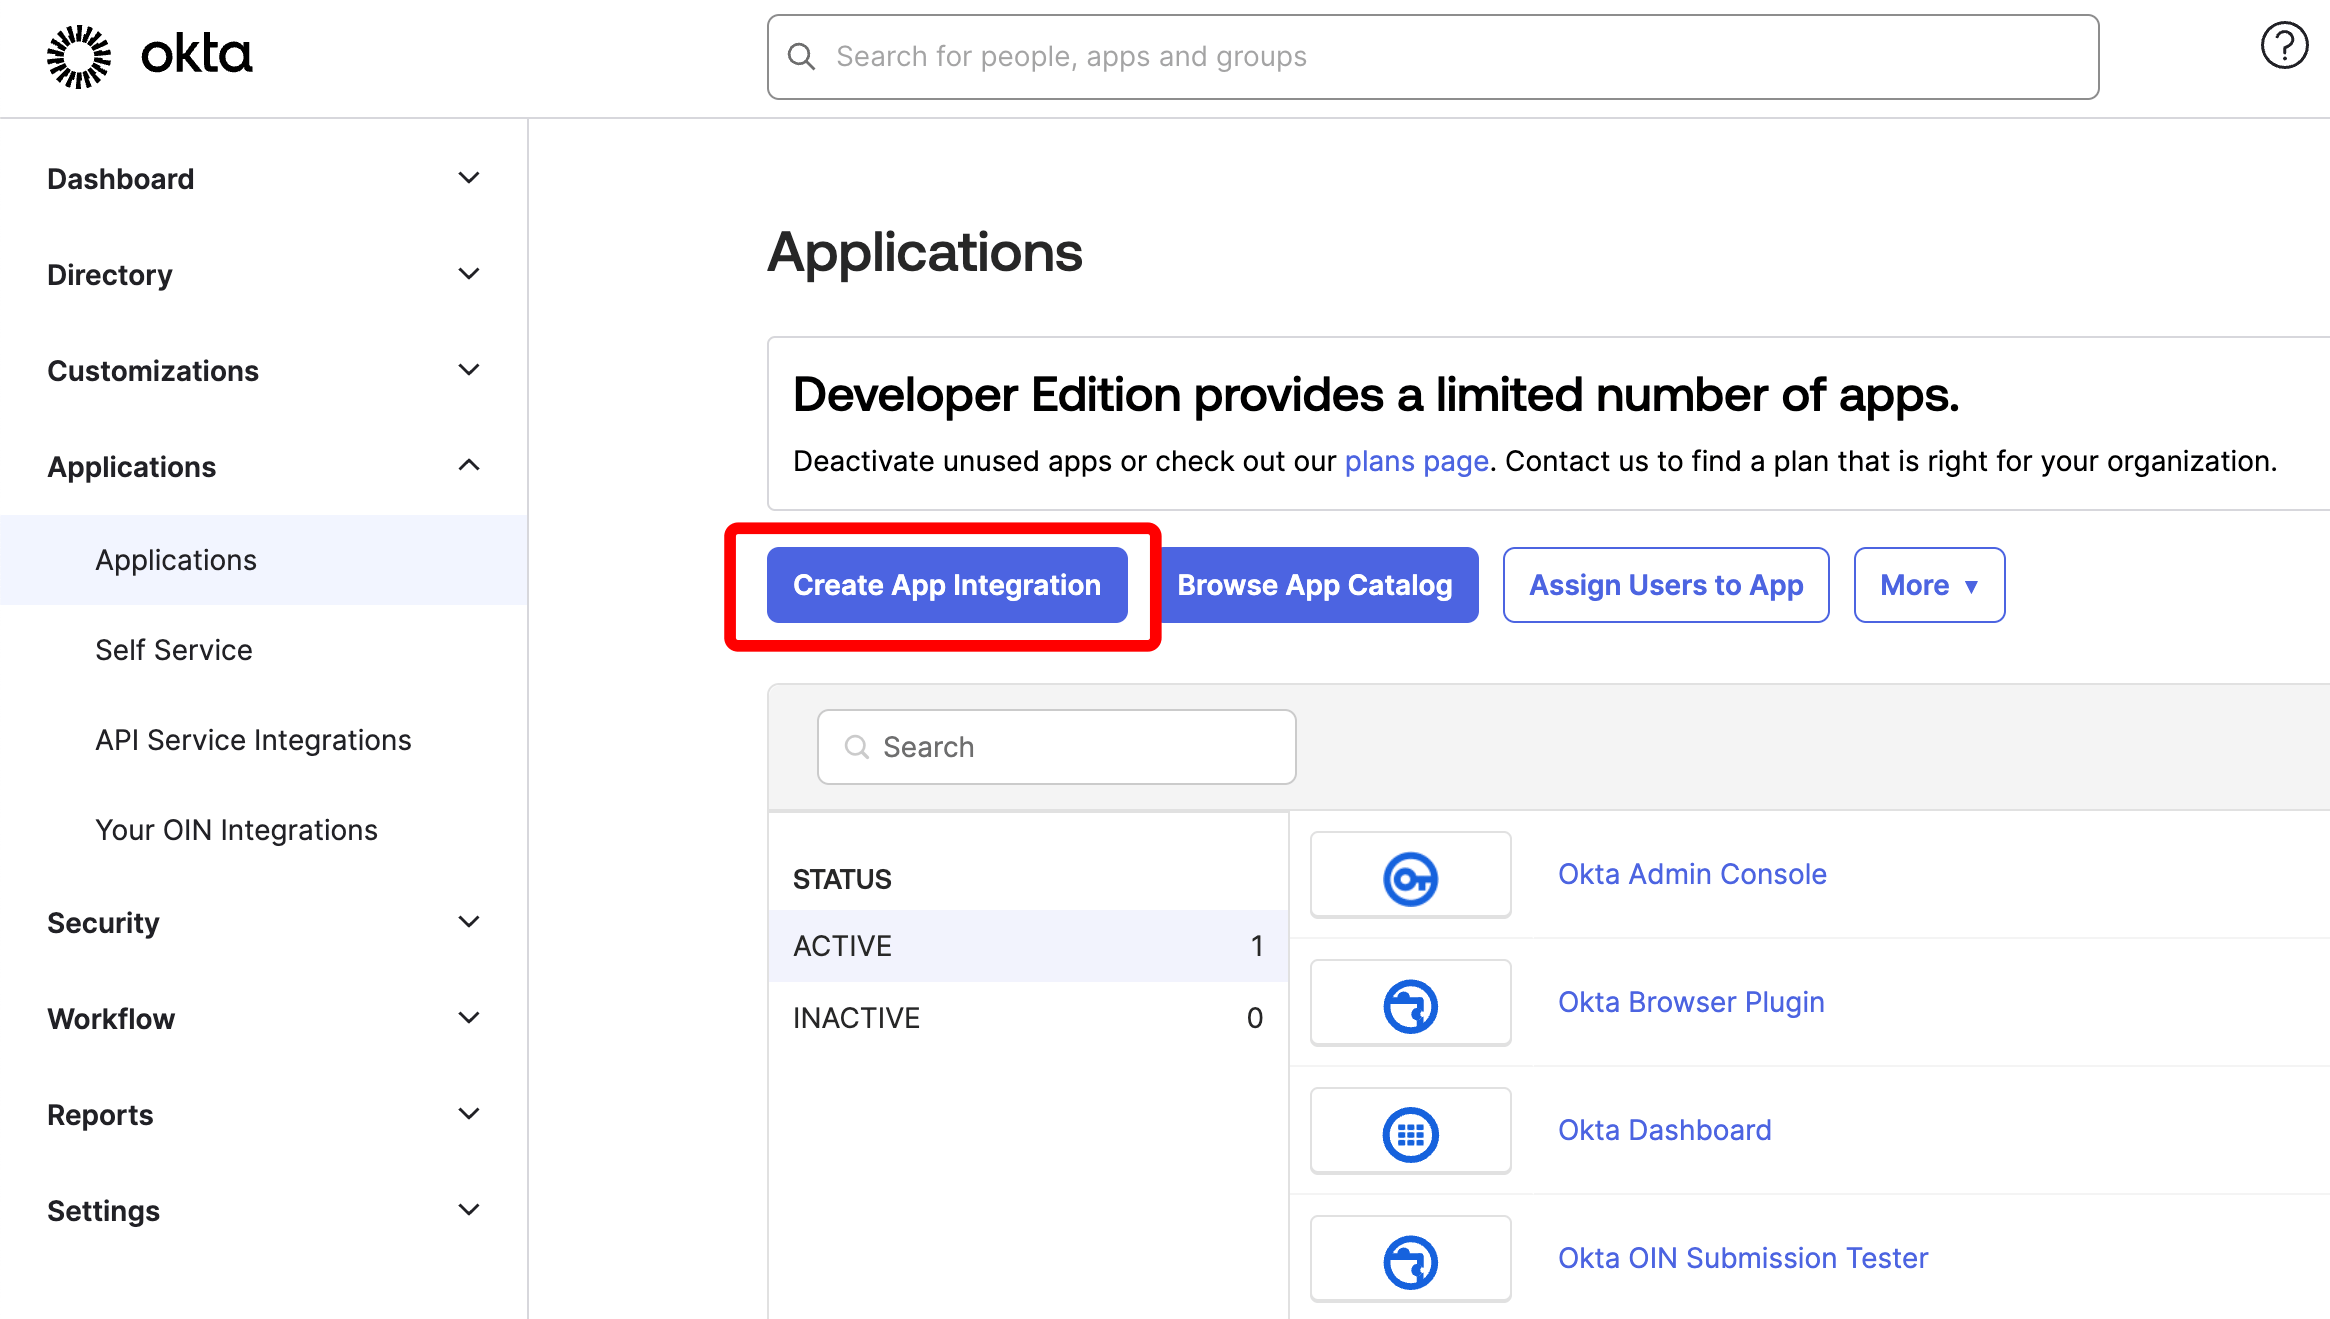 4. On the screen named "Create a new app integration," select **OIDC - OpenID Connect** and **Single-Page Application**. Then click "Next."
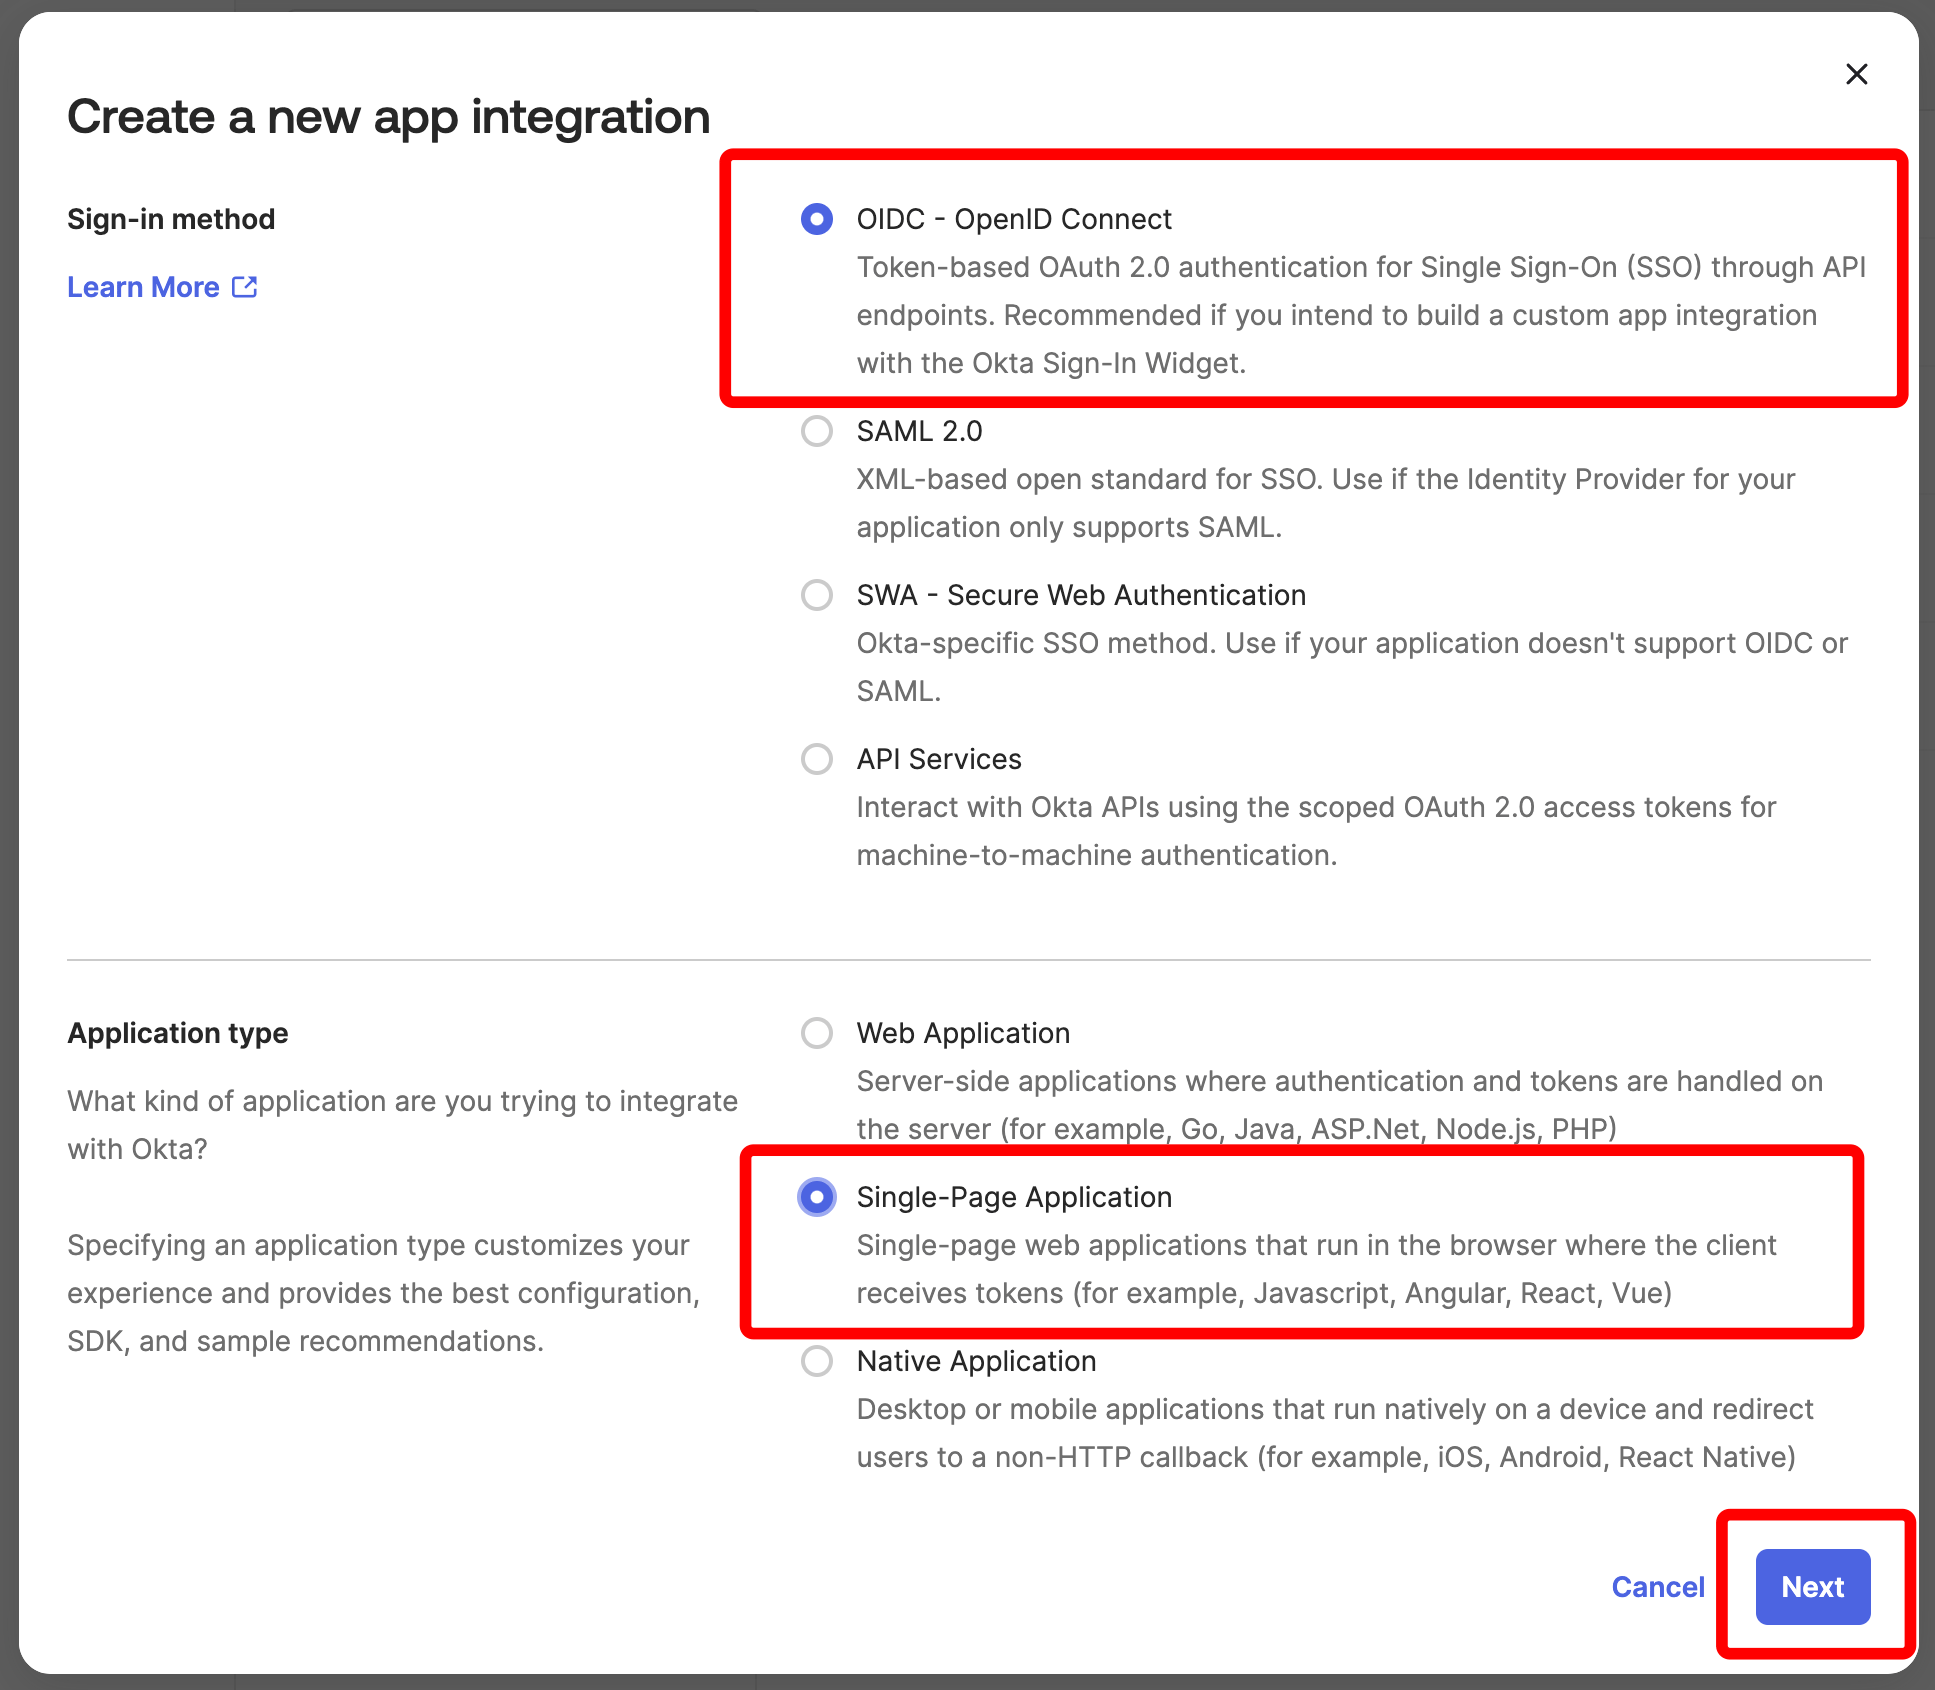 5. On the screen named "New Single-Page App Integration," fill out the values as follows and click **Save**:
* App integration name, for example "W\&B"
* Grant type: Select both **Authorization Code** and **Implicit (hybrid)**
* Sign-in redirect URIs: https\://YOUR\_W\_AND\_B\_URL/oidc/callback
* Sign-out redirect URIs: https\://YOUR\_W\_AND\_B\_URL/logout
* Assignments: Select **Skip group assignment for now**
5. On the screen named "New Single-Page App Integration," fill out the values as follows and click **Save**:
* App integration name, for example "W\&B"
* Grant type: Select both **Authorization Code** and **Implicit (hybrid)**
* Sign-in redirect URIs: https\://YOUR\_W\_AND\_B\_URL/oidc/callback
* Sign-out redirect URIs: https\://YOUR\_W\_AND\_B\_URL/logout
* Assignments: Select **Skip group assignment for now**
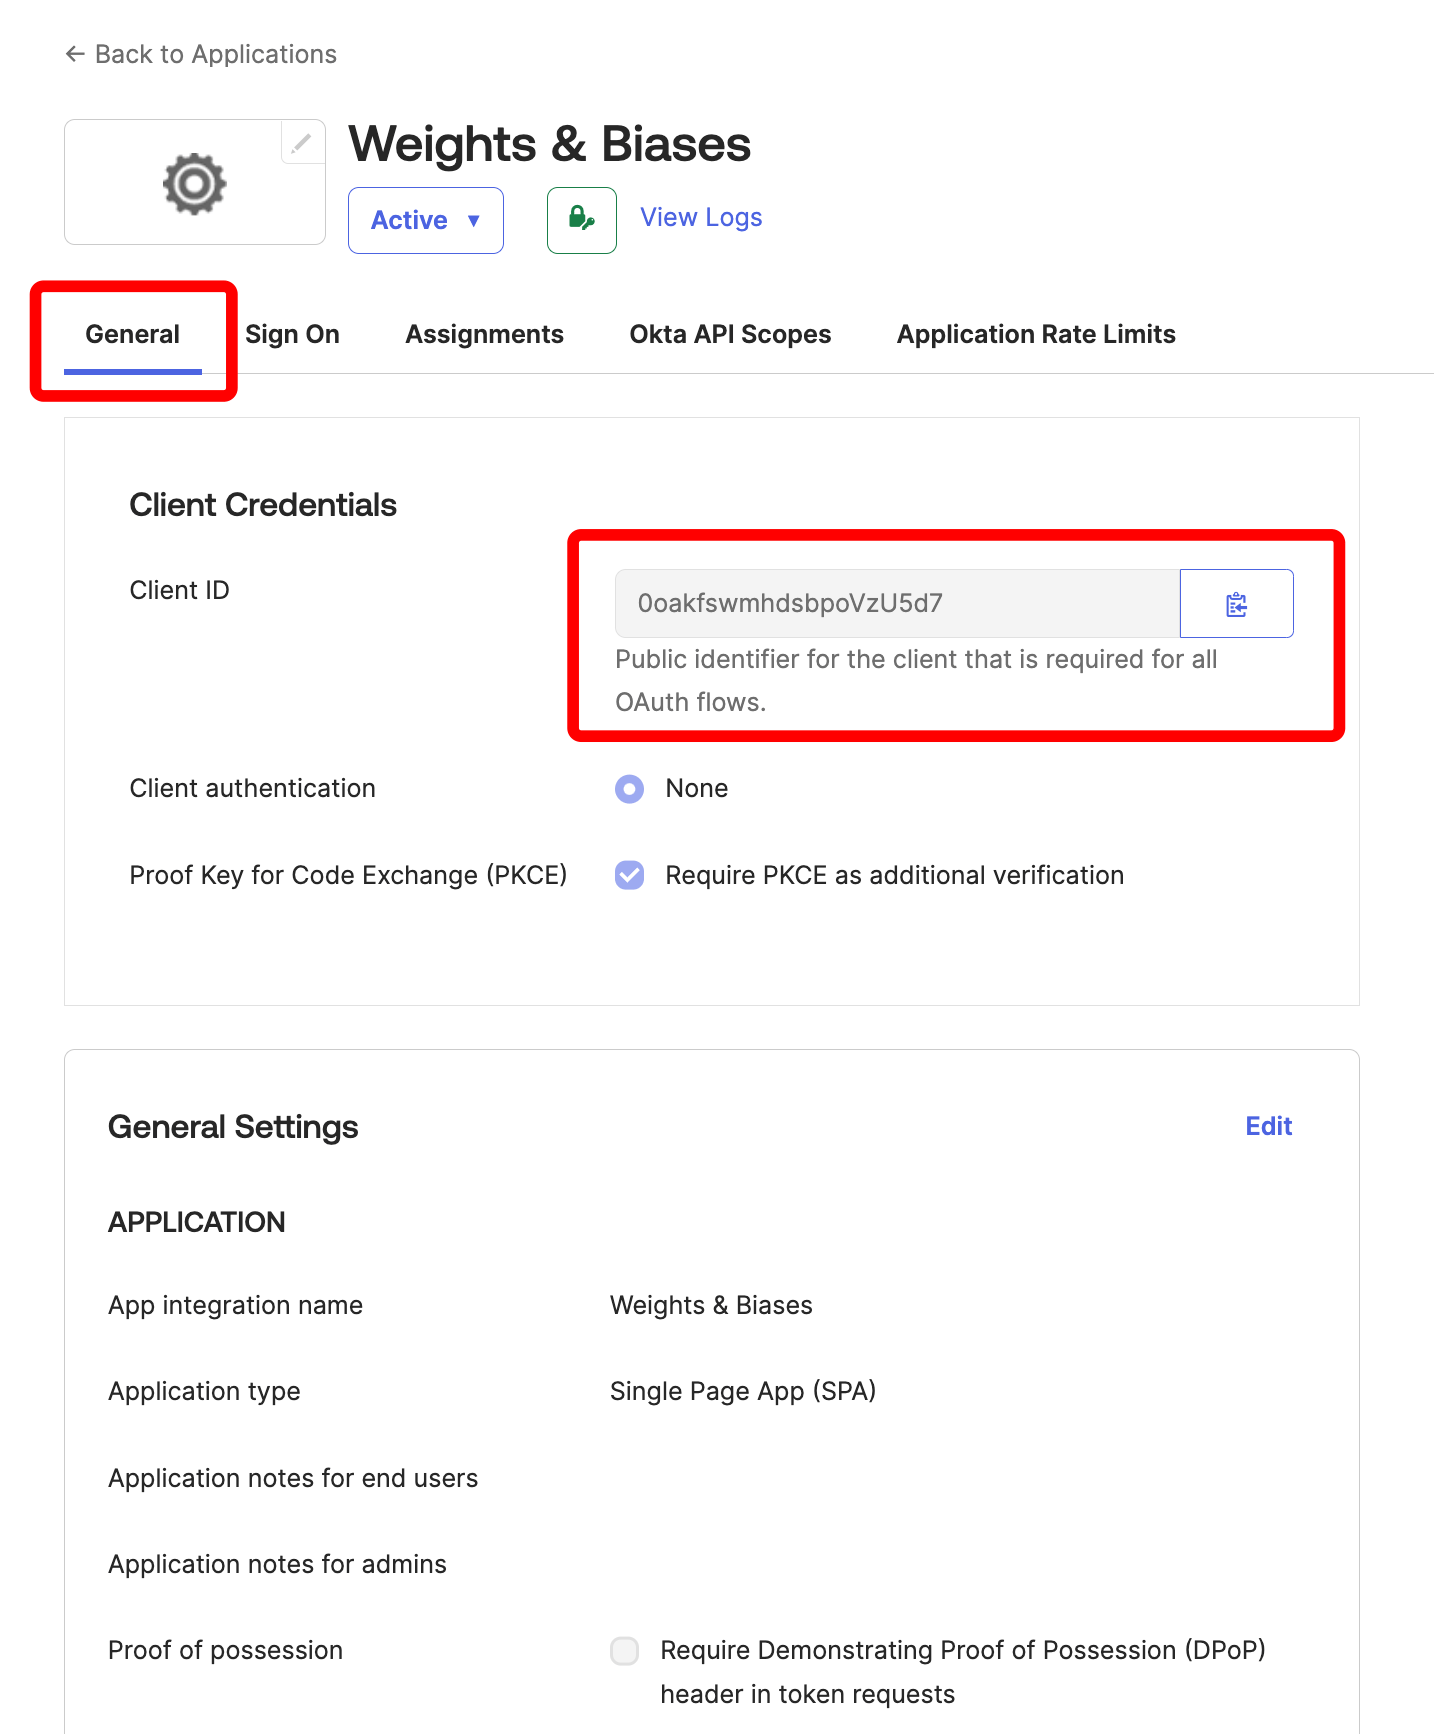
 6. On the overview screen of the Okta application that you just created, make note of the **Client ID** under **Client Credentials** under the **General** tab:
 7. To identify the Okta OIDC Issuer URL, select **Settings** and then **Account** on the left side.
The Okta UI shows the company name under **Organization Contact**.
7. To identify the Okta OIDC Issuer URL, select **Settings** and then **Account** on the left side.
The Okta UI shows the company name under **Organization Contact**.
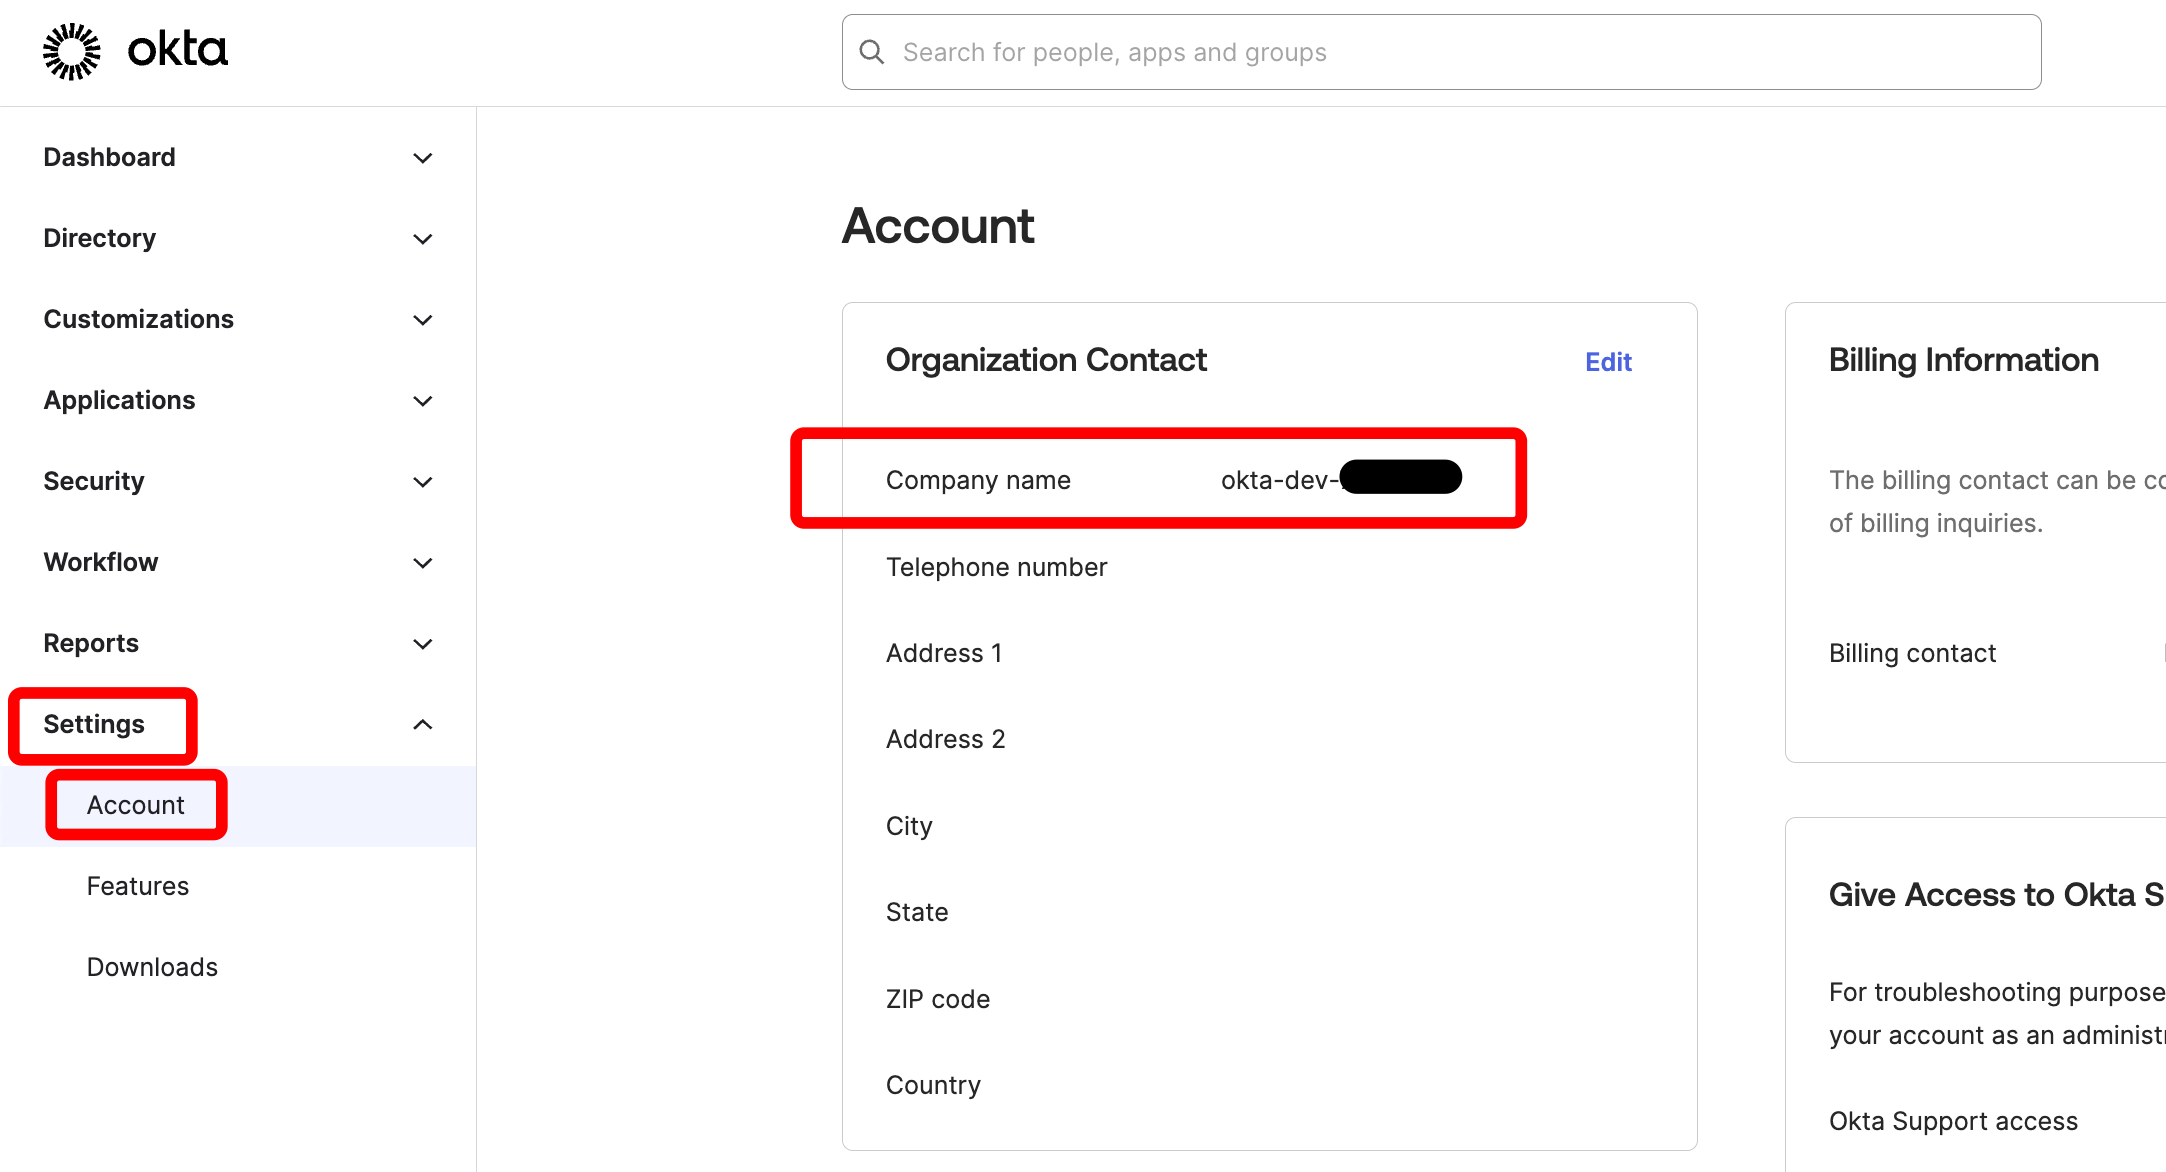 The OIDC issuer URL has the following format: `https://COMPANY.okta.com`. Replace COMPANY with the corresponding value. Make note of it.
1. Log in to the [Azure Portal](https://portal.azure.com/).
2. Navigate to **Microsoft Entra ID** service and select **App registrations** from the left sidebar.
3. Click **New registration** at the top of the page.
4. On the "Register an application" screen, configure the following:
* **Name**: Enter a descriptive name (e.g., "Weights and Biases application")
* **Supported account types**: Keep the default "Single tenant" or modify as needed
* **Redirect URI**: Select platform type **Single-page application** and enter `https://YOUR_W_AND_B_URL/oidc/callback`
* Click **Register**
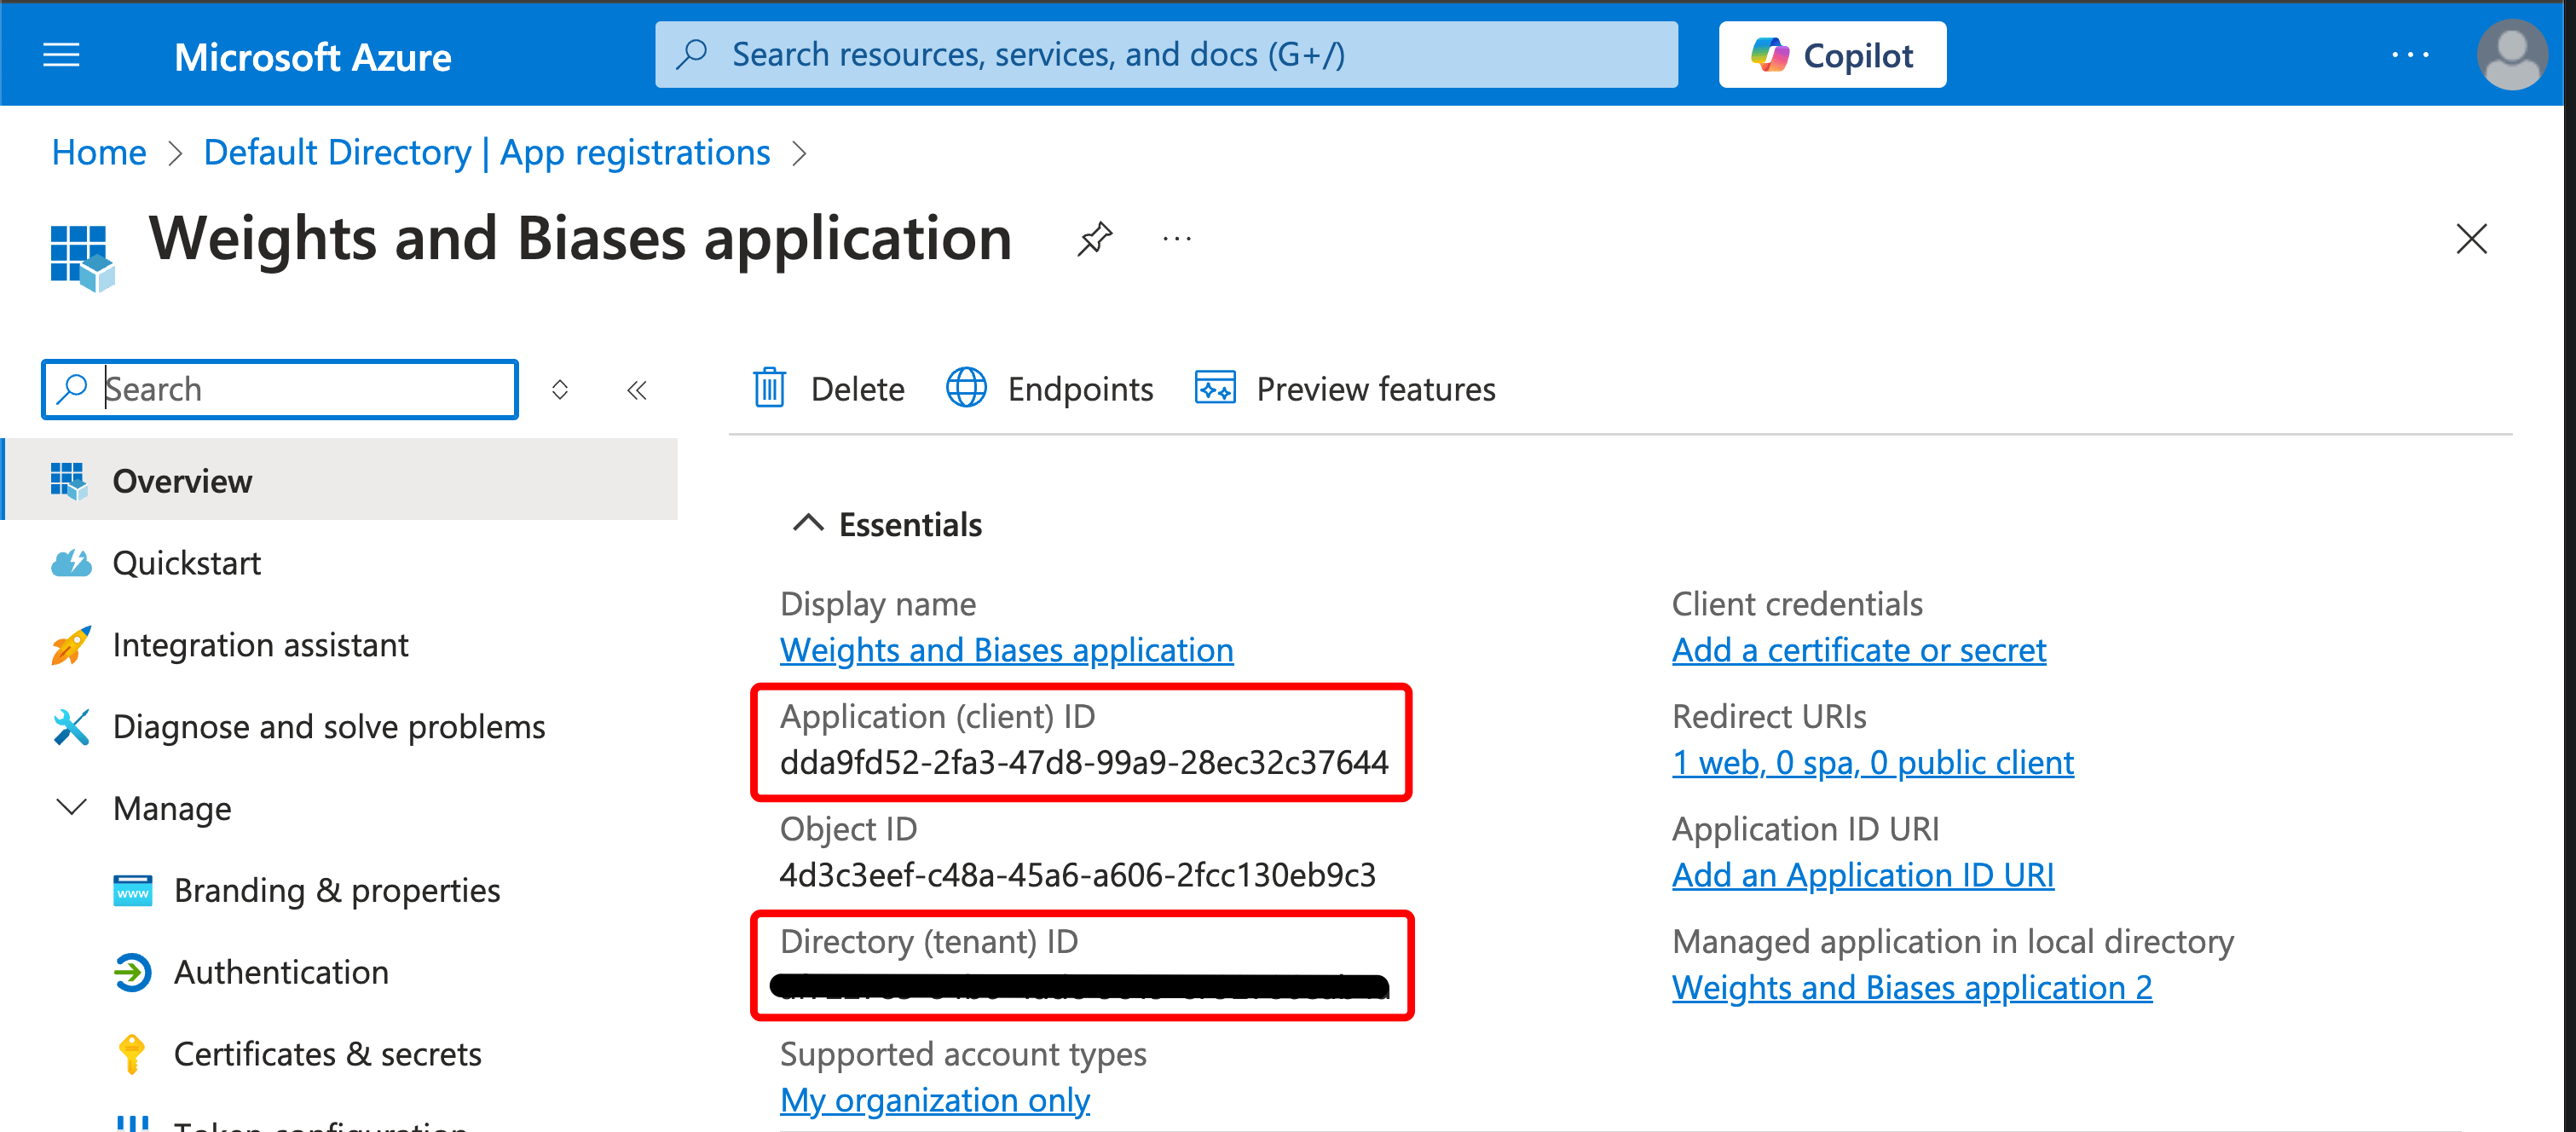
5. After registration, note the following values from the Overview page:
* **Application (client) ID** - This is your OIDC Client ID
* **Directory (tenant) ID** - This is used for your OIDC Issuer URL
The OIDC issuer URL has the following format: `https://COMPANY.okta.com`. Replace COMPANY with the corresponding value. Make note of it.
1. Log in to the [Azure Portal](https://portal.azure.com/).
2. Navigate to **Microsoft Entra ID** service and select **App registrations** from the left sidebar.
3. Click **New registration** at the top of the page.
4. On the "Register an application" screen, configure the following:
* **Name**: Enter a descriptive name (e.g., "Weights and Biases application")
* **Supported account types**: Keep the default "Single tenant" or modify as needed
* **Redirect URI**: Select platform type **Single-page application** and enter `https://YOUR_W_AND_B_URL/oidc/callback`
* Click **Register**
5. After registration, note the following values from the Overview page:
* **Application (client) ID** - This is your OIDC Client ID
* **Directory (tenant) ID** - This is used for your OIDC Issuer URL
 6. Configure authentication settings:
* Select **Authentication** from the left sidebar
* Under **Front-channel logout URL**, enter `https://YOUR_W_AND_B_URL/logout`
* Click **Save**
7. Create a client secret:
* Select **Certificates & secrets** from the left sidebar
* Click **New client secret**
* Add a description (e.g., "wandb")
* Choose an expiration period
* Click **Add**
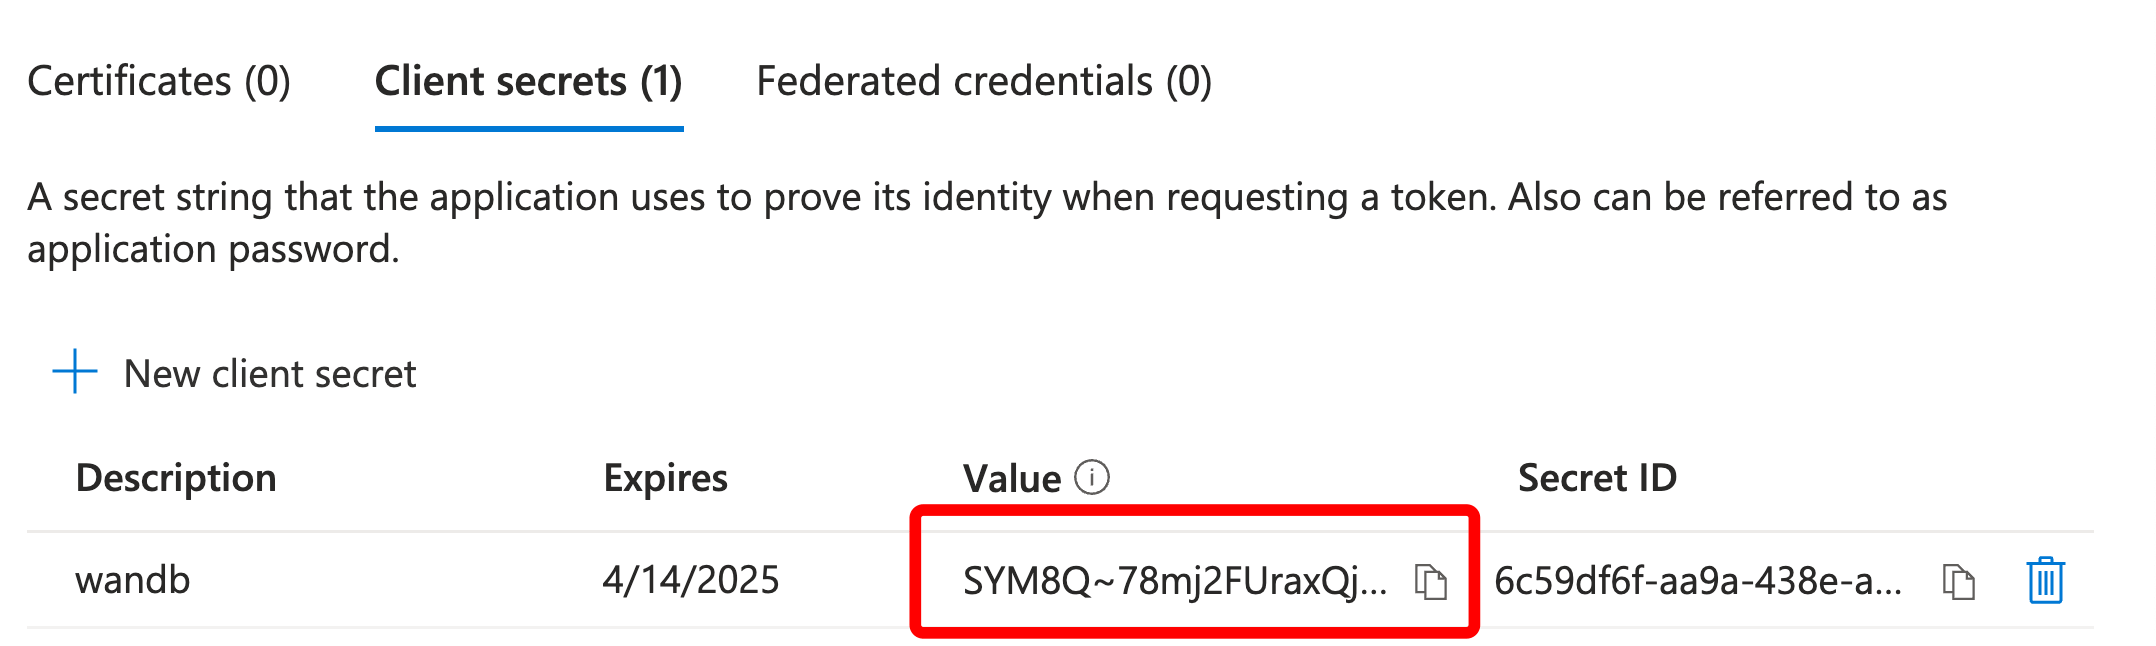
* **Important**: Copy and save the secret **Value** immediately (not the Secret ID)
6. Configure authentication settings:
* Select **Authentication** from the left sidebar
* Under **Front-channel logout URL**, enter `https://YOUR_W_AND_B_URL/logout`
* Click **Save**
7. Create a client secret:
* Select **Certificates & secrets** from the left sidebar
* Click **New client secret**
* Add a description (e.g., "wandb")
* Choose an expiration period
* Click **Add**
* **Important**: Copy and save the secret **Value** immediately (not the Secret ID)
 You should now have collected three essential values:
* **OIDC Client ID**: The Application (client) ID from step 5
* **OIDC Client Secret**: The secret value from step 7
* **OIDC Issuer URL**: `https://login.microsoftonline.com/{TenantID}/v2.0` (replace {TenantID} with your Directory ID from step 5)
The v2.0 endpoint supports both personal Microsoft accounts and work/school accounts. If your organization requires the v1.0 endpoint, use `https://login.microsoftonline.com/{TenantID}` instead.
When configuring W\&B Server, use:
* **Auth Method**: `pkce` (recommended for Entra ID)
* **OIDC Client Secret**: Required for Entra ID applications
## Set up SSO on the W\&B Server
To set up SSO, you need administrator privileges and the following information:
* OIDC Client ID
* OIDC Auth method (`implicit` or `pkce`)
* OIDC Issuer URL
* OIDC Client Secret (optional; depends on how you have setup your IdP)
If your IdP requires a OIDC Client Secret, specify it by passing the [environment variables](/platform/hosting/env-vars) `GORILLA_OIDC_SECRET`.
* In the UI, go to **System Console** > **Settings** > **Advanced** > **User Spec** and add `GORILLA_OIDC_SECRET` to the `extraENV` section as shown below.
* In Helm, configure `values.global.extraEnv` as shown below.
```yaml theme={null}
values:
global:
extraEnv:
GORILLA_OIDC_SECRET=""
```
If you're unable to log in to your instance after configuring SSO, you can restart the instance with the `LOCAL_RESTORE=true` environment variable set. This outputs a temporary password to the containers logs and disables SSO. Once you've resolved any issues with SSO, you must remove that environment variable to enable SSO again.
The System Console is the successor to the System Settings page. It is available with the [W\&B Kubernetes Operator](/platform/hosting/operator/) based deployment.
1. Refer to [Access the W\&B Management Console](/platform/hosting/operator/#access-the-wb-management-console).
2. Navigate to **Settings**, then **Authentication**. Select **OIDC** in the **Type** dropdown.
You should now have collected three essential values:
* **OIDC Client ID**: The Application (client) ID from step 5
* **OIDC Client Secret**: The secret value from step 7
* **OIDC Issuer URL**: `https://login.microsoftonline.com/{TenantID}/v2.0` (replace {TenantID} with your Directory ID from step 5)
The v2.0 endpoint supports both personal Microsoft accounts and work/school accounts. If your organization requires the v1.0 endpoint, use `https://login.microsoftonline.com/{TenantID}` instead.
When configuring W\&B Server, use:
* **Auth Method**: `pkce` (recommended for Entra ID)
* **OIDC Client Secret**: Required for Entra ID applications
## Set up SSO on the W\&B Server
To set up SSO, you need administrator privileges and the following information:
* OIDC Client ID
* OIDC Auth method (`implicit` or `pkce`)
* OIDC Issuer URL
* OIDC Client Secret (optional; depends on how you have setup your IdP)
If your IdP requires a OIDC Client Secret, specify it by passing the [environment variables](/platform/hosting/env-vars) `GORILLA_OIDC_SECRET`.
* In the UI, go to **System Console** > **Settings** > **Advanced** > **User Spec** and add `GORILLA_OIDC_SECRET` to the `extraENV` section as shown below.
* In Helm, configure `values.global.extraEnv` as shown below.
```yaml theme={null}
values:
global:
extraEnv:
GORILLA_OIDC_SECRET=""
```
If you're unable to log in to your instance after configuring SSO, you can restart the instance with the `LOCAL_RESTORE=true` environment variable set. This outputs a temporary password to the containers logs and disables SSO. Once you've resolved any issues with SSO, you must remove that environment variable to enable SSO again.
The System Console is the successor to the System Settings page. It is available with the [W\&B Kubernetes Operator](/platform/hosting/operator/) based deployment.
1. Refer to [Access the W\&B Management Console](/platform/hosting/operator/#access-the-wb-management-console).
2. Navigate to **Settings**, then **Authentication**. Select **OIDC** in the **Type** dropdown.
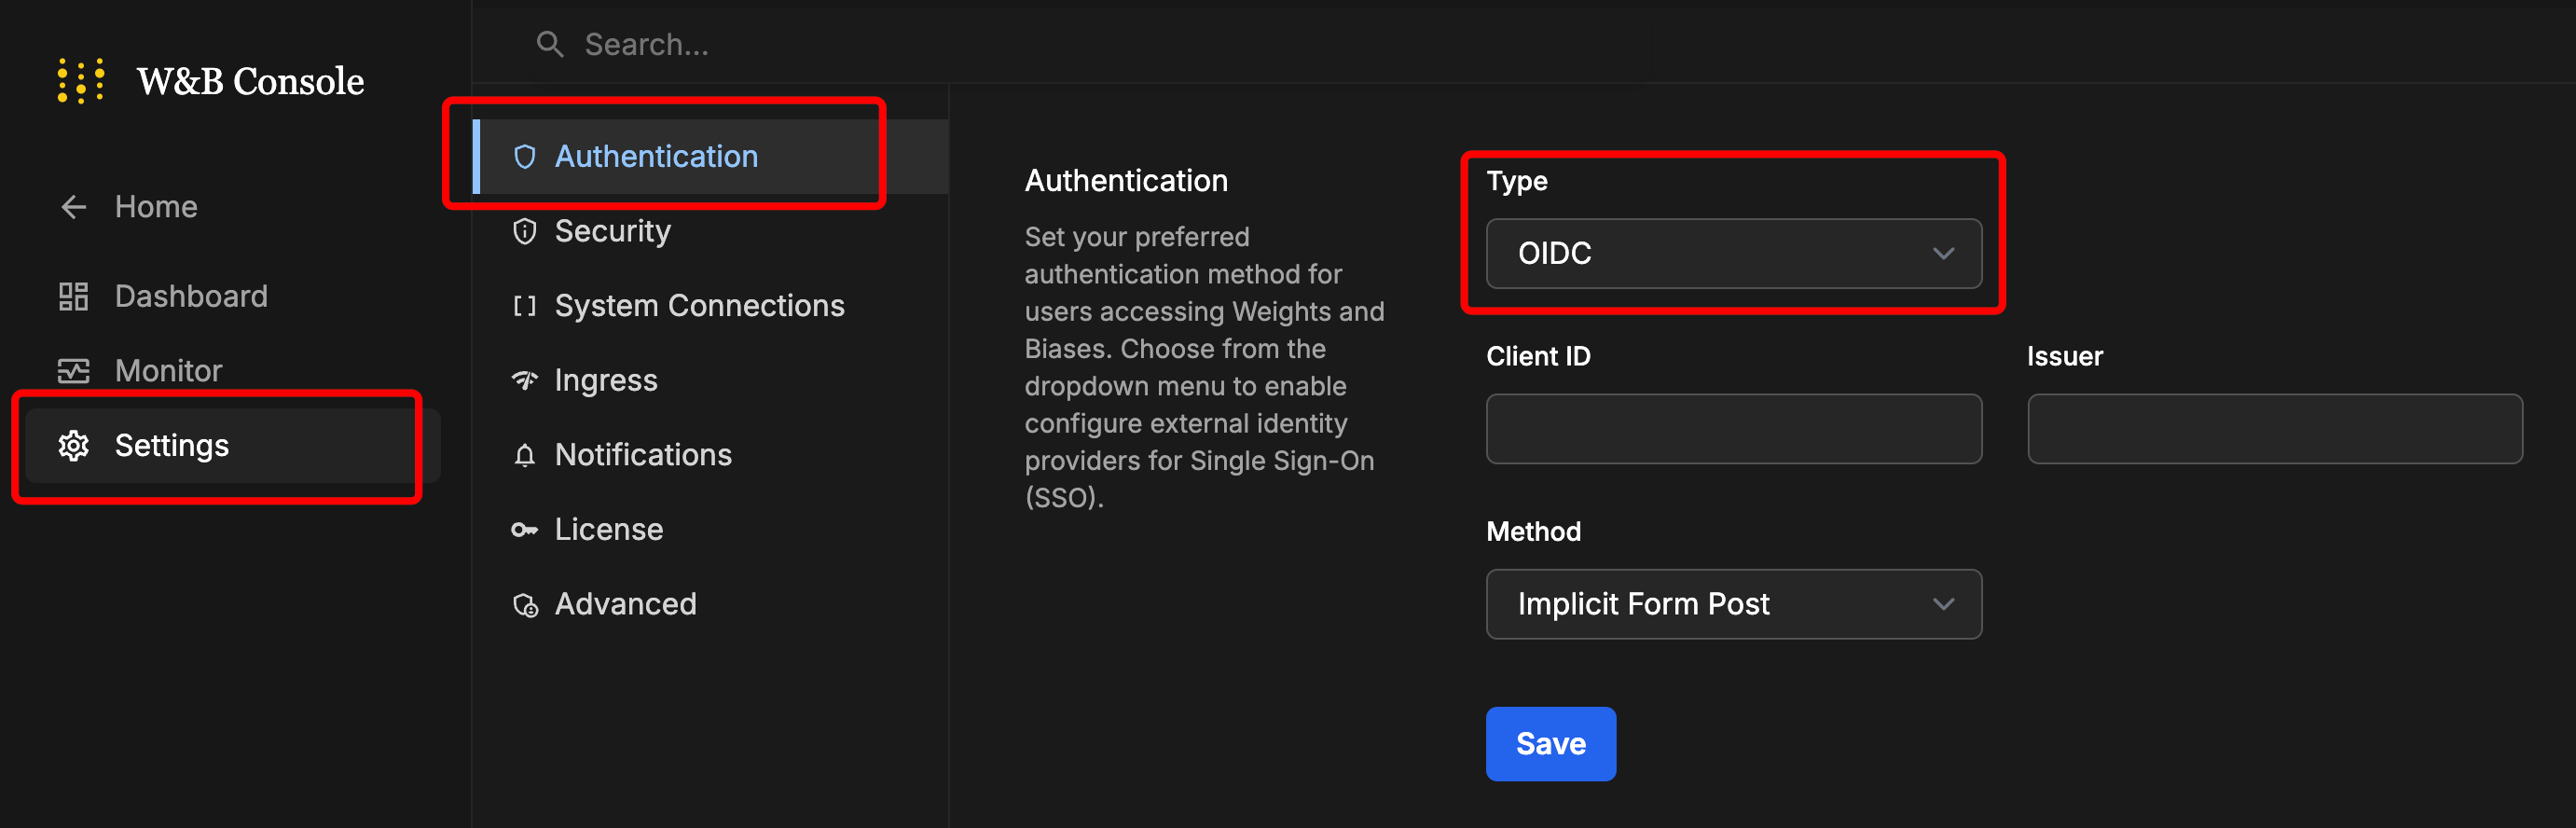 3. Enter the values.
4. Click on **Save**.
5. Log out and then log back in, this time using the IdP login screen.
## Find your customer namespace
Before you can configure team-level BYOB with CoreWeave storage on W\&B Dedicated Cloud or Self-Managed, you need to obtain your organization's **Customer Namespace**. You can view and copy it from the bottom of the **Authentication** tab.
For detailed instructions on configuring CoreWeave storage with your Customer Namespace, see [CoreWeave requirements for Dedicated Cloud / Self-Managed](/platform/hosting/data-security/secure-storage-connector#coreweave-customer-namespace).
1. Sign in to your Weights\&Biases instance.
2. Navigate to the W\&B App.
3. Enter the values.
4. Click on **Save**.
5. Log out and then log back in, this time using the IdP login screen.
## Find your customer namespace
Before you can configure team-level BYOB with CoreWeave storage on W\&B Dedicated Cloud or Self-Managed, you need to obtain your organization's **Customer Namespace**. You can view and copy it from the bottom of the **Authentication** tab.
For detailed instructions on configuring CoreWeave storage with your Customer Namespace, see [CoreWeave requirements for Dedicated Cloud / Self-Managed](/platform/hosting/data-security/secure-storage-connector#coreweave-customer-namespace).
1. Sign in to your Weights\&Biases instance.
2. Navigate to the W\&B App.
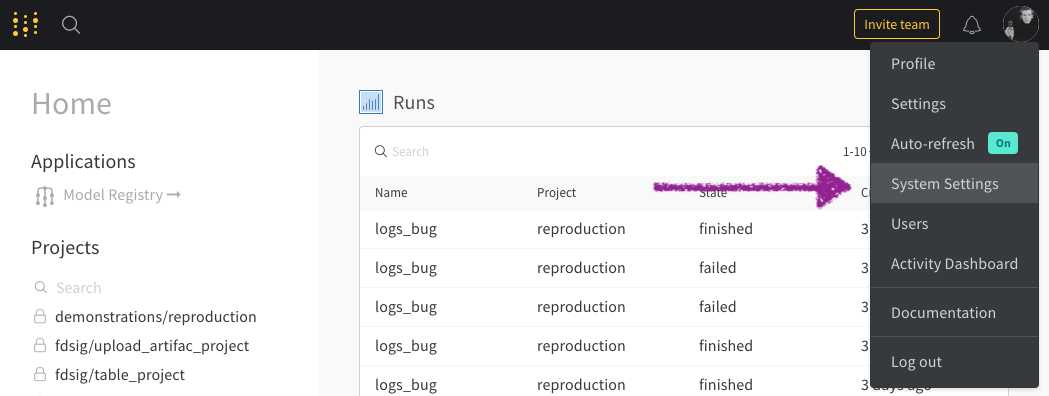
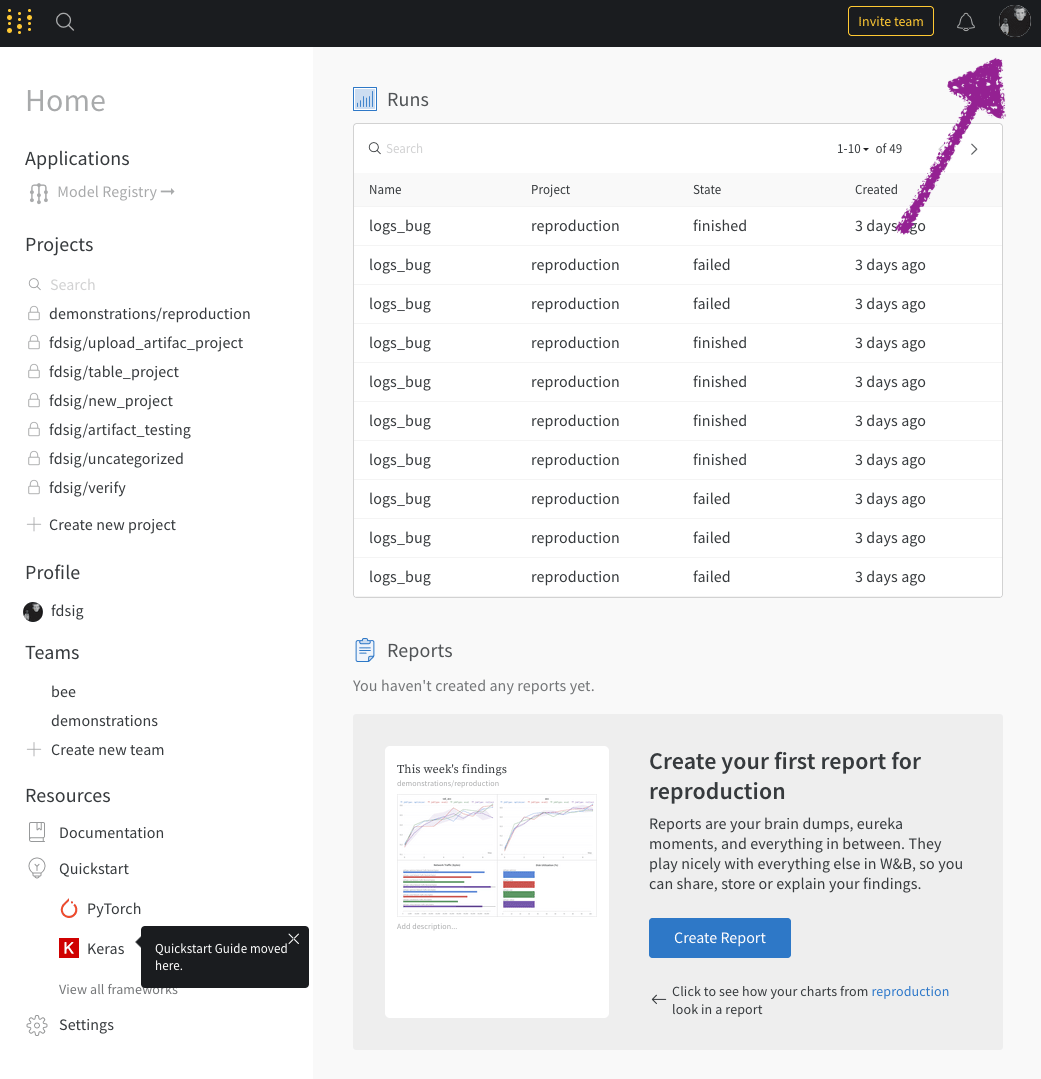 3. From the dropdown, select **System Settings**:
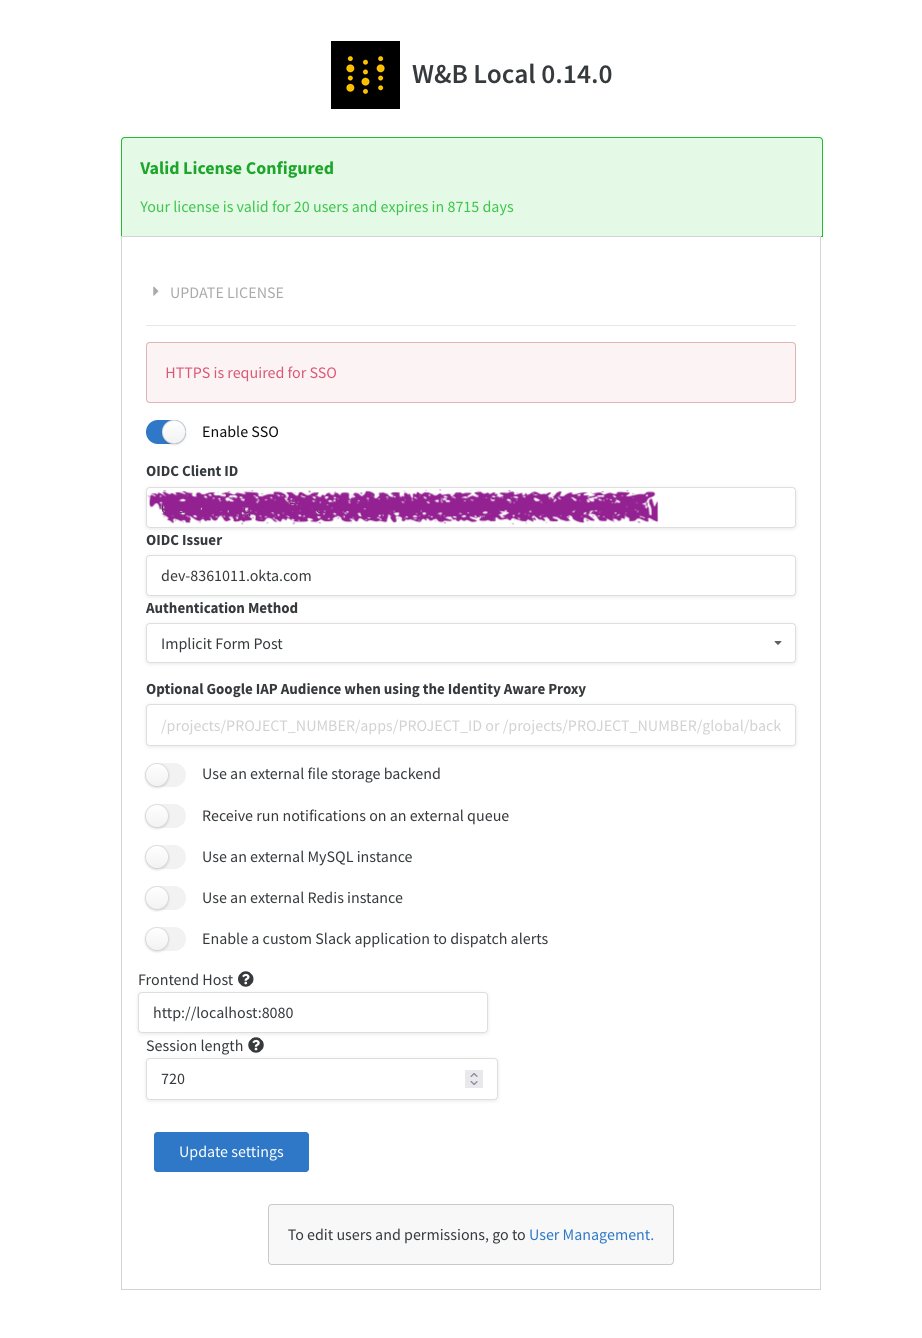
 4. Enter your Issuer, Client ID, and Authentication Method.
5. Select **Update settings**.
4. Enter your Issuer, Client ID, and Authentication Method.
5. Select **Update settings**.
 If you're unable to log in to your instance after configuring SSO, you can restart the instance with the `LOCAL_RESTORE=true` environment variable set. This outputs a temporary password to the containers logs and turn off SSO. Once you've resolved any issues with SSO, you must remove that environment variable to enable SSO again.
## Security Assertion Markup Language (SAML)
W\&B Server does not support SAML.
If you're unable to log in to your instance after configuring SSO, you can restart the instance with the `LOCAL_RESTORE=true` environment variable set. This outputs a temporary password to the containers logs and turn off SSO. Once you've resolved any issues with SSO, you must remove that environment variable to enable SSO again.
## Security Assertion Markup Language (SAML)
W\&B Server does not support SAML.