> ## Documentation Index
> Fetch the complete documentation index at: https://wb-21fd5541-feat-cli-docs-generator.mintlify.site/llms.txt
> Use this file to discover all available pages before exploring further.
> Hosting W&B Server on Google Cloud.
# Deploy W&B Platform on Google Cloud
W\&B recommends fully managed deployment options such as [W\&B Multi-tenant Cloud](/platform/hosting/hosting-options/multi_tenant_cloud) or [W\&B Dedicated Cloud](/platform/hosting/hosting-options/dedicated_cloud/) deployment types. W\&B fully managed services are simple and secure to use, with minimum to no configuration required.
If you've determined to Self-Managed W\&B Server, W\&B recommends using the [W\&B Server Google Cloud Terraform Module](https://registry.terraform.io/modules/wandb/wandb/google/latest) to deploy the platform on Google Cloud.
The module documentation is extensive and contains all available options that can be used.
Before you start, W\&B recommends that you choose one of the [remote backends](https://developer.hashicorp.com/terraform/language/backend/remote) available for Terraform to store the [State File](https://developer.hashicorp.com/terraform/language/state).
The State File is the necessary resource to roll out upgrades or make changes in your deployment without recreating all components.
The Terraform Module will deploy the following `mandatory` components:
* VPC
* Cloud SQL for MySQL
* Cloud Storage Bucket
* Google Kubernetes Engine
* KMS Crypto Key
* Load Balancer
Other deployment options can also include the following optional components:
* Memory store for Redis
* Pub/Sub messages system
## Pre-requisite permissions
The account that will run the terraform need to have the role `roles/owner` in the Google Cloud project used.
## General steps
The steps on this topic are common for any deployment option covered by this documentation.
1. Prepare the development environment.
* Install [Terraform](https://developer.hashicorp.com/terraform/tutorials/aws-get-started/install-cli)
* We recommend creating a Git repository with the code that will be used, but you can keep your files locally.
* Create a project in [Google Cloud Console](https://console.cloud.google.com/)
* Authenticate with Google Cloud (make sure to [install gcloud](https://cloud.google.com/sdk/docs/install) before)
`gcloud auth application-default login`
2. Create the `terraform.tfvars` file.
The `tvfars` file content can be customized according to the installation type, but the minimum recommended will look like the example below.
```bash theme={null}
project_id = "wandb-project"
region = "europe-west2"
zone = "europe-west2-a"
namespace = "wandb"
license = "xxxxxxxxxxyyyyyyyyyyyzzzzzzz"
subdomain = "wandb-gcp"
domain_name = "wandb.ml"
```
The variables defined here need to be decided before the deployment because. The `namespace` variable will be a string that will prefix all resources created by Terraform.
The combination of `subdomain` and `domain` will form the FQDN that W\&B will be configured. In the example above, the W\&B FQDN will be `wandb-gcp.wandb.ml`
3. Create the file `variables.tf`
For every option configured in the `terraform.tfvars` Terraform requires a correspondent variable declaration.
```
variable "project_id" {
type = string
description = "Project ID"
}
variable "region" {
type = string
description = "Google region"
}
variable "zone" {
type = string
description = "Google zone"
}
variable "namespace" {
type = string
description = "Namespace prefix used for resources"
}
variable "domain_name" {
type = string
description = "Domain name for accessing the Weights & Biases UI."
}
variable "subdomain" {
type = string
description = "Subdomain for access the Weights & Biases UI."
}
variable "license" {
type = string
description = "W&B License"
}
```
## Deployment - Recommended (\~20 mins)
This is the most straightforward deployment option configuration that will create all `Mandatory` components and install in the `Kubernetes Cluster` the latest version of `W&B`.
1. Create the `main.tf`
In the same directory where you created the files in the [General Steps](#general-steps), create a file `main.tf` with the following content:
```
provider "google" {
project = var.project_id
region = var.region
zone = var.zone
}
provider "google-beta" {
project = var.project_id
region = var.region
zone = var.zone
}
data "google_client_config" "current" {}
provider "kubernetes" {
host = "https://${module.wandb.cluster_endpoint}"
cluster_ca_certificate = base64decode(module.wandb.cluster_ca_certificate)
token = data.google_client_config.current.access_token
}
# Spin up all required services
module "wandb" {
source = "wandb/wandb/google"
version = "~> 5.0"
namespace = var.namespace
license = var.license
domain_name = var.domain_name
subdomain = var.subdomain
}
# You'll want to update your DNS with the provisioned IP address
output "url" {
value = module.wandb.url
}
output "address" {
value = module.wandb.address
}
output "bucket_name" {
value = module.wandb.bucket_name
}
```
2. Deploy W\&B
To deploy W\&B, execute the following commands:
```
terraform init
terraform apply -var-file=terraform.tfvars
```
## Deployment with REDIS Cache
Another deployment option uses `Redis` to cache the SQL queries and speedup the application response when loading the metrics for the experiments.
You need to add the option `create_redis = true` to the same `main.tf` file specified in the recommended [Deployment option section](#deployment---recommended-20-mins) to enable the cache.
```
[...]
module "wandb" {
source = "wandb/wandb/google"
version = "~> 1.0"
namespace = var.namespace
license = var.license
domain_name = var.domain_name
subdomain = var.subdomain
allowed_inbound_cidrs = ["*"]
#Enable Redis
create_redis = true
}
[...]
```
## Deployment with External Queue
Deployment option 3 consists of enabling the external `message broker`. This is optional because the W\&B brings embedded a broker. This option doesn't bring a performance improvement.
The Google Cloud resource that provides the message broker is the `Pub/Sub`, and to enable it, you will need to add the option `use_internal_queue = false` to the same `main.tf` specified in the recommended [Deployment option section](#deployment---recommended-20-mins)
```
[...]
module "wandb" {
source = "wandb/wandb/google"
version = "~> 1.0"
namespace = var.namespace
license = var.license
domain_name = var.domain_name
subdomain = var.subdomain
allowed_inbound_cidrs = ["*"]
#Create and use Pub/Sub
use_internal_queue = false
}
[...]
```
## Other deployment options
You can combine all three deployment options adding all configurations to the same file.
The [Terraform Module](https://github.com/wandb/terraform-google-wandb) provides several options that can be combined along with the standard options and the minimal configuration found in `Deployment - Recommended`
## Manual configuration
To use a Google Cloud Storage bucket as a file storage backend for W\&B, you will need to create a:
* [PubSub Topic and Subscription](#create-pubsub-topic-and-subscription)
* [Storage Bucket](#create-storage-bucket)
* [PubSub Notification](#create-pubsub-notification)
### Create PubSub Topic and Subscription
Follow the procedure below to create a PubSub topic and subscription:
1. Navigate to the Pub/Sub service within the Google Cloud Console
2. Select **Create Topic** and provide a name for your topic.
3. At the bottom of the page, select **Create subscription**. Ensure **Delivery Type** is set to **Pull**.
4. Click **Create**.
Make sure the service account or account that your instance is running has the `pubsub.admin` role on this subscription. For details, see [https://cloud.google.com/pubsub/docs/access-control#console](https://cloud.google.com/pubsub/docs/access-control#console).
### Create Storage Bucket
1. Navigate to the **Cloud Storage Buckets** page.
2. Select **Create bucket** and provide a name for your bucket. Ensure you choose a **Standard** [storage class](https://cloud.google.com/storage/docs/storage-classes).
Ensure that the service account or account that your instance is running has both:
* access to the bucket you created in the previous step
* `storage.objectAdmin` role on this bucket. For details, see [https://cloud.google.com/storage/docs/access-control/using-iam-permissions#bucket-add](https://cloud.google.com/storage/docs/access-control/using-iam-permissions#bucket-add)
Your instance also needs the `iam.serviceAccounts.signBlob` permission in Google Cloud to create signed file URLs. Add `Service Account Token Creator` role to the service account or IAM member that your instance is running as to enable permission.
3. Enable CORS access. This can only be done using the command line. First, create a JSON file with the following CORS configuration.
```
cors:
- maxAgeSeconds: 3600
method:
- GET
- PUT
origin:
- ''
responseHeader:
- Content-Type
```
Note that the scheme, host, and port of the values for the origin must match exactly.
4. Make sure you have `gcloud` installed, and logged into the correct Google Cloud project.
5. Next, run the following:
```bash theme={null}
gcloud storage buckets update gs:// --cors-file=
```
### Create PubSub Notification
Follow the procedure below in your command line to create a notification stream from the Storage Bucket to the Pub/Sub topic.
You must use the CLI to create a notification stream. Ensure you have `gcloud` installed.
1. Log into your Google Cloud project.
2. Run the following in your terminal:
```bash theme={null}
gcloud pubsub topics list # list names of topics for reference
gcloud storage ls # list names of buckets for reference
# create bucket notification
gcloud storage buckets notifications create gs:// --topic=
```
[Further reference is available on the Cloud Storage website.](https://cloud.google.com/storage/docs/reporting-changes)
### Configure W\&B server
1. Finally, navigate to the W\&B `System Connections` page at `http(s)://YOUR-W&B-SERVER-HOST/console/settings/system`.
2. Select the provider `Google Cloud Storage (gcs)`,
3. Provide the name of the GCS bucket
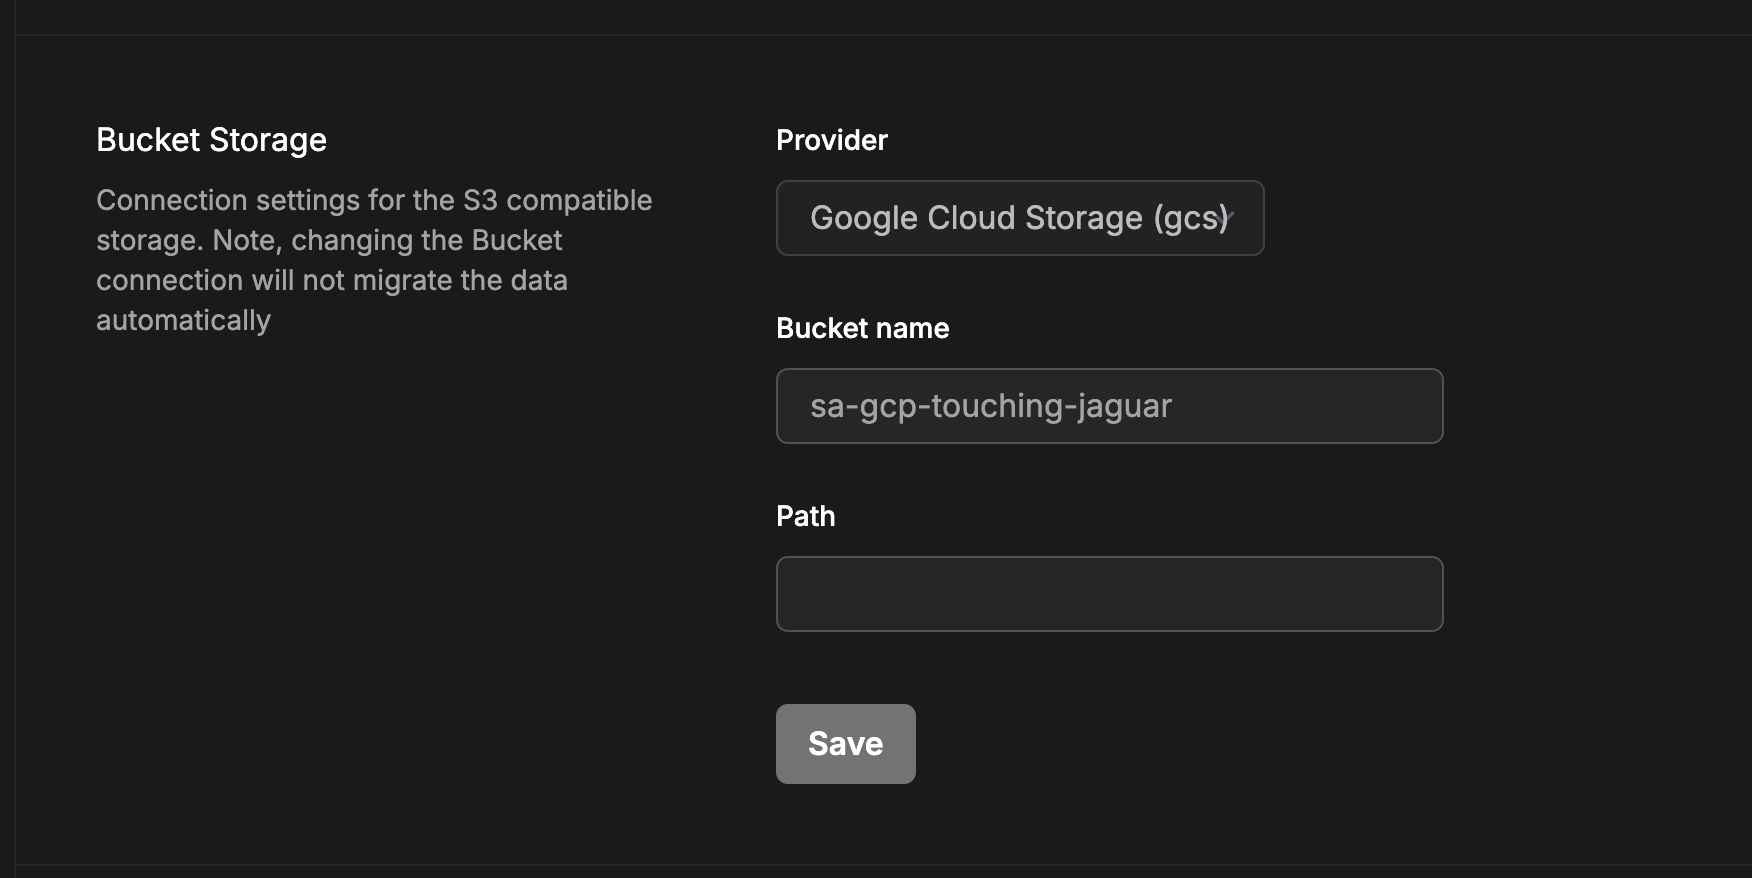 4. Press **Update settings** to apply the new settings.
## Upgrade W\&B Server
Follow the steps outlined here to update W\&B:
1. Add `wandb_version` to your configuration in your `wandb_app` module. Provide the version of W\&B you want to upgrade to. For example, the following line specifies W\&B version `0.48.1`:
```
module "wandb_app" {
source = "wandb/wandb/kubernetes"
version = "~>5.0"
license = var.license
wandb_version = "0.58.1"
```
Alternatively, you can add the `wandb_version` to the `terraform.tfvars` and create a variable with the same name and instead of using the literal value, use the `var.wandb_version`
2. After you update your configuration, complete the steps described in the [Deployment option section](#deployment---recommended-20-mins).
4. Press **Update settings** to apply the new settings.
## Upgrade W\&B Server
Follow the steps outlined here to update W\&B:
1. Add `wandb_version` to your configuration in your `wandb_app` module. Provide the version of W\&B you want to upgrade to. For example, the following line specifies W\&B version `0.48.1`:
```
module "wandb_app" {
source = "wandb/wandb/kubernetes"
version = "~>5.0"
license = var.license
wandb_version = "0.58.1"
```
Alternatively, you can add the `wandb_version` to the `terraform.tfvars` and create a variable with the same name and instead of using the literal value, use the `var.wandb_version`
2. After you update your configuration, complete the steps described in the [Deployment option section](#deployment---recommended-20-mins).